20 Testing and validating template elements
Until now, we have been building the template boilerplate, that is, the main skeleton functions (page, navbar, navbar menu, …) as well as some components, such as cards, ribbons and progress bars. We also exposed some techniques to substantially give more interactivity to the template, leveraging our freshly acquired JavaScript skills. Does this mean we are ready to make the template public? Not yet since some essentials steps are missing:
- Input validation is a crucial step toward success. Briefly, it consists of checking user inputs so that your functions fail safely and elegantly by providing meaningful error messages or warnings. This concept has already been covered in R for Data Science (Wickham and Grolemund 2017), Advanced R (Hadley 2019) and many other resources. Hence, we are not trying to reinvent the wheel, and we rely on the already existing patterns, whose effectiveness is no longer to be demonstrated. Welcome to the defensive programming world!
- On the other hand, testing components allows us to check if a function does what it is supposed to do. Consequently, it is a proof of robustness and increases reproducibility. It significantly reduces the mental load when it comes to start code refactoring, thereby making you feel slightly less guilty about creating breaking changes since, most of the time, your tests will be able to capture those errors.
20.1 Validate template functions
20.1.1 Create your own validations
Below, we showcase some examples to validate user inputs. We first consider the tabler_card() element from Chapter 17:
library(shiny)
tabler_card <- function(..., title = NULL, status = NULL,
                        width = 6, stacked = FALSE,
                        padding = NULL) {

  card_cl <- paste0(
    "card",
    if (stacked) " card-stacked",
    if (!is.null(padding)) paste0(" card-", padding)
  )

  status_tag <- if (!is.null(status)) {
    div(class = paste0("card-status-top bg-", status))
  }

  main_wrapper <- div(class = paste0("col-md-", width))

  # ...Code commented for space reasons
}
The first thing is to think about what to validate. Here, we see at least three tests:
- Checking the status value.
- Checking the width value.
- Checking the padding value.
Writing validation tests requires knowing about the underlying mechanisms. In our case, we must know the Bootstrap 4 grid rules and valid color statuses. The Bootstrap 4 grid ranges from 1 to 12. In other words, a card having a width of 12 will take the full page, whereas we may align three cards of width 4. Valid statuses are primary, secondary, success, info, danger, warning, light and dark.
It is therefore pretty straightforward to validate the card width as it must be numeric and between 1 and 12. Moreover, since the template has other containers including the width parameter, we create a function to rule them all:
validate_width <- function(width) {
  if (is.numeric(width)) {
    if (width < 1 || width > 12) {
      stop(
        "\n width must belong to [1, 12], as per
        BS4 grid documentation.
        See https://getbootstrap.com/docs/4.0/layout/grid/."
      )
    }
  } else {
    stop("width must be numeric.")
  }
}

validate_width(4)
try(validate_width(-1))
#> Error in validate_width(-1) :
#> width must belong to [1, 12], as per
#> BS4 grid documentation.
#> See https://getbootstrap.com/docs/4.0/layout/grid/.
try(validate_width(13)) #> Error in validate_width(13) :
#> width must belong to [1, 12], as per
#> BS4 grid documentation.
#> See https://getbootstrap.com/docs/4.0/layout/grid/.
try(validate_width("string")) #> Error in validate_width("string") : width must be numeric.To check the status parameter, we save the valid statuses in a vector and take the validStatuses function from shinydashboard utils. It also make sense to create a function since this parameter is widely used among other template components.
Contrary to the shinydashboard function, our custom valid_status() does not fail
if the status is NULL since it is not a mandatory parameter.
valid_statuses <- c(
  "primary",
  "secondary",
  "success",
  "info",
  "warning",
  "danger",
  "light",
  "dark"
)

validate_status <- function(status) {

  if (is.null(status)) {
    return(TRUE)
  } else {
    if (status %in% valid_statuses) {
      return(TRUE)
    }
  }

  stop("Invalid status: ", status, ". Valid statuses are: ",
       paste(valid_statuses, collapse = ", "), ".")
}
We finish by the padding validation. According to the Tabler documentation,
there are three possible choices, namely sm, md or lg:
valid_paddings <- c("sm", "md", "lg")

validate_padding <- function(padding) {
  if (!is.null(padding)) {
    if (!(padding %in% valid_paddings)) {
      stop("Invalid status: ", padding, ". Valid choices are: ",
       paste(valid_paddings, collapse = ", "), ".")
    }
  }
}
We apply all these validation to our card element.
tabler_card <- function(..., title = NULL, status = NULL,
                        width = 6, stacked = FALSE,
                        padding = NULL) {

  validate_status(status)
  validate_width(width)
  validate_padding(padding)

  # ... remaining code
}
As of R 4.0.0, the stopifnot() function may be a good alternative to stop().
We recommend to be reasonable and not to validate every single parameter, as it might be not that productive and could cause frustration for the end users.
20.1.2 Existing utils functions
20.1.2.2 Validating CSS units
The validateCssUnit() function belongs to the Shiny exported function. It is useful to quickly check any parameter involving a CSS unit like width and height.
library(shiny)
validateCssUnit("5px")
#> [1] "5px"
validateCssUnit("5rem")#> [1] "5rem"
validateCssUnit("100%")#> [1] "100%"
try(validateCssUnit("plop"))#> Error in validateCssUnit("plop") :
#> "plop" is not a valid CSS unit (e.g., "100%", "400px", "auto")20.2 Testing templates elements
Imagine if one day, someone or yourself accidentally removed the width validation function, after a significant code refactoring. Later, you receive a new message from GitHub, stating that someone opened a new issue. According to the report, the card is not properly displayed although no error is thrown. Among the 400 lines of code provided, you hardly notice that the width parameter is set to 13, which is not in line with the Bootstrap 4 documentation, as it should remain between 1 and 12. You lost 10 minutes and so did your end user, which is even worse.
With a proper testing pipeline, this problem could have been avoided. Ironically, writing the corresponding test takes only two minutes.
A reference for testing functions is the {testthat} package (Wickham 2021). In short, a unit test consists of setting expectations about our function and checking whether they fail or pass. For instance, in the previous tabler_card() example, validate_width() must fail if the given width is not in the expected bounds or not numeric. We apply the test_that() function with a description containing the test context, followed by the expectations inside the curly brackets.
library(testthat)
test_that("validate width works", {
  expect_error(tabler_card(width = -1))
  expect_error(tabler_card(width = 13))
  expect_error(tabler_card(width = "hello world"))
})
#> Test passed 🎉We then test validate_status() and validate_padding().
test_that("validate status works", {
  expect_error(tabler_card(status = "toto"))
})
#> Test passed 🎉
test_that("validate padding works", {
  expect_error(tabler_card(width = "xs"))
})
#> Test passed 😸So far so good. In few lines of code, we substantially increased the robustness of our function without increasing its complexity. Now, let’s try to remove the validate_width() step from the tabler_card().
tabler_card <- function(..., title = NULL, status = NULL,
                        width = 6, stacked = FALSE,
                        padding = NULL) {

  # validation
  # validate_width(width)
  validate_status(status)
  validate_padding(padding)

  # ... Code commented
}
test_that("validate width works", {
  expect_error(tabler_card(width = -1))
  expect_error(tabler_card(width = 13))
  expect_error(tabler_card(width = "hello world"))
})
#> ── Failure (<text>:2:3): validate width works ──────────────────────────────────
#> `tabler_card(width = -1)` did not throw an error.
#>
#> ── Failure (<text>:3:3): validate width works ──────────────────────────────────
#> `tabler_card(width = 13)` did not throw an error.
#>
#> ── Failure (<text>:4:3): validate width works ──────────────────────────────────
#> `tabler_card(width = "hello world")` did not throw an error.Notice how the three above tests elegantly fail. The provided context (“validate width works”) immediately indicates the culprit, which is a game changer for debugging.
20.2.1 Caveats
As stated above, there might be situations where tests should be carefully written and not rely too much on upstream package structure. I propose considering a real-life example involving the shinyMobile CRAN package, depending on shiny and htmltools. It has a function, namely preview_mobile() allowing you to preview an app on a mobile device iframe. This function has an internal test to check if HTML dependencies are properly applied. However, the test may fail if Shiny dependencies are updated, which is independent of shinyMobile but would eventually prevent shiny from being released on CRAN. Below is what is obtained with shiny 1.6.0.
#> [[1]]
#> List of 10
#>  $ name      : chr "marvel-devices-css"
#>  $ version   : chr "1.0.0"
#>  ...
#>
#> [[2]]
#> List of 10
#>  $ name      : chr "bootstrap"
#>  $ version   : chr "3.4.1"
#>  ...
Then doing expect_length(deps, 2) is fine. However, with shiny 1.7.0 (it could also come from another htmltools version), the result is significantly different:
#> [[1]]
#> List of 10
#>  $ name      : chr "jquery"
#>  $ version   : chr "3.6.0"
#>  ...
#>
#> [[2]]
#> List of 10
#>  $ name      : chr "marvel-devices-css"
#>  $ version   : chr "1.0.0"
#>  ...
#>
#> [[3]]
#> List of 10
#>  $ name      : chr "bootstrap"
#>  $ version   : chr "3.4.1"
#>  ...
The returned list contains one extra dependency, thereby breaking the underlying test. This subsequently requires changing the test.
20.2.2 Testing template behavior
Testing the JavaScript behavior is one of the biggest challenges to validating a template. If the R component has been carefully validated, it does not mean that its JavaScript effects are. For instance, let’s consider the tabler_progress() that may be updated with update_tabler_progress(). How do we check whether the progress value is correctly set?
20.2.2.1 R side
Testing the R side is quite easy. Let’s recall the update_tabler_progress() function:
update_tabler_progress <- function(
  id,
  value,
  session = shiny::getDefaultReactiveDomain()
) {
  message <- list(id = session$ns(id), value = value)
  session$sendCustomMessage(type = "update-progress", message)
}
This function does two things:
- Captures the id of the targeted progress and its new value.
- Sends the message the JS.
The test consists of checking whether we send all elements to the session. We first create
a dummy session environment which contains ns to mimic the session$ns function
and sendCustomMessage to test the message handler part:
session <- as.environment(
  list(
    ns = identity,
    sendCustomMessage = function(type, message) {
      session$lastCustomMessage <- list(
        type = type,
        message = message
      )
    }
  )
)
Here, sendCustomMessage simply stores the last sent message in session$lastCustomMessage, and session$ns returns the provided element:
session$ns("test")#> [1] "test"
session$sendCustomMessage("test", message = "hello")
session$lastCustomMessage
#> $type
#> [1] "test"
#>
#> $message
#> [1] "hello"We then call update_tabler_progress() with some random parameters and capture the
last sent message in the res variable:
library(OSUICode)
update_tabler_progress(
  id = "myprogress",
  value = 10,
  session = session
)
res <- session$lastCustomMessage
Importantly, don’t forget to set the session parameter to session, otherwise,
it will default to shiny::getDefaultReactiveDomain which is NULL outside of the Shiny app.
Now we can set expectations:
-
resmust be a list of length 2. - The expected custom handler type is
update-progress. - The sent value is 10.
- The sent id is
myprogress.
And next we can translate into testthat:
test_that("update progress works", {
  update_tabler_progress(
    id = "myprogress",
    value = 10,
    session = session
  )
  res <- session$lastCustomMessage

  expect_length(res, 2)
  expect_equal(res$type, "update-progress")
  expect_length(res$message, 2)
  expect_equal(res$message$id, "myprogress")
  expect_equal(res$message$value, 10)
})
#> Test passed 🌈This test being set, it ensures seamlessly capturing any breaking change in the API.
20.2.2.2 JS side
In the following, we have to test whether the corresponding JS handler works as expected:
Shiny.addCustomMessageHandler(
  'update-progress', function(message) {
    $('#' + message.id)
      .css('width', message.value +'%')
      .attr('aria-valuenow', message.value);
});
We leverage the {crrry} packages developed by Colin Fay from ThinkR.
Overall, {crrry} is an adaptation of {crrri}, specifically optimized for shiny, which is a native Chrome Remote Interface in R using the Chrome Debugging Protocol. In other words, it provides tools to programmatically control
the web browser and do many things like inspecting a web page,
taking screenshots, testing… You may know {shinytest}, which relies on another technology,
phantomjs. The latter does not play well with Bootstrap 4 templates, which is why we don’t use it
here. At the time of writing, RStudio is working on {shinytest2}, which will leverage the Chrome Debugging Protocol, thereby fixing the current issues with Bootstrap 4 and above. However, as it is not yet public, we could not describe it in this book.
{crrry} is already introduced in the Engineering Production-Grade Shiny Apps book (https://engineering-shiny.org/step-secure.html#testing-the-interactive-logic) (Fay et al. 2020).
The first step is to call the update_tabler_progress() example locally and add the returned
url to the following code. We run the app in another process with processx:
p <- processx::process$new(
  "Rscript",
  c(
    "-e",
    "options('shiny.port'= 3515);
     OSUICode::run_example('tabler/update-progress')"
  )
)

Sys.sleep(2)

p$is_alive()
#> [1] TRUE
That way, we can run our test in the main R process, after checking that our task p is alive. Here the app
loads immediately, but you may wait some time if there are computations:
library(crrry)
library(testthat)
test <- CrrryOnPage$new(
  chrome_bin = pagedown::find_chrome(),
  chrome_port = httpuv::randomPort(),
  url = "http://localhost:3515/",
  headless = TRUE
)
#> Running '/Applications/Google Chrome.app/...'
#>   '--no-first-run --headless' \
#>   '--user-data-dir=/Users/david/Library/...' \
#>   '--remote-debugging-port=31683'
We wait for Shiny to be ready:
test$wait_for_shiny_ready()
#> Shiny is computing
#> ✔ Shiny is still running
Note the output of --remote-debugging-port=31683 gives the link to the Chrome devtools link
to inspect the current app, as shown in Figure 20.1. In practice, open a web browser window and type localhost:<REMOTE-DEBUGGING-PORT>. Follow the instructions and select the Console tab within the developer tools.
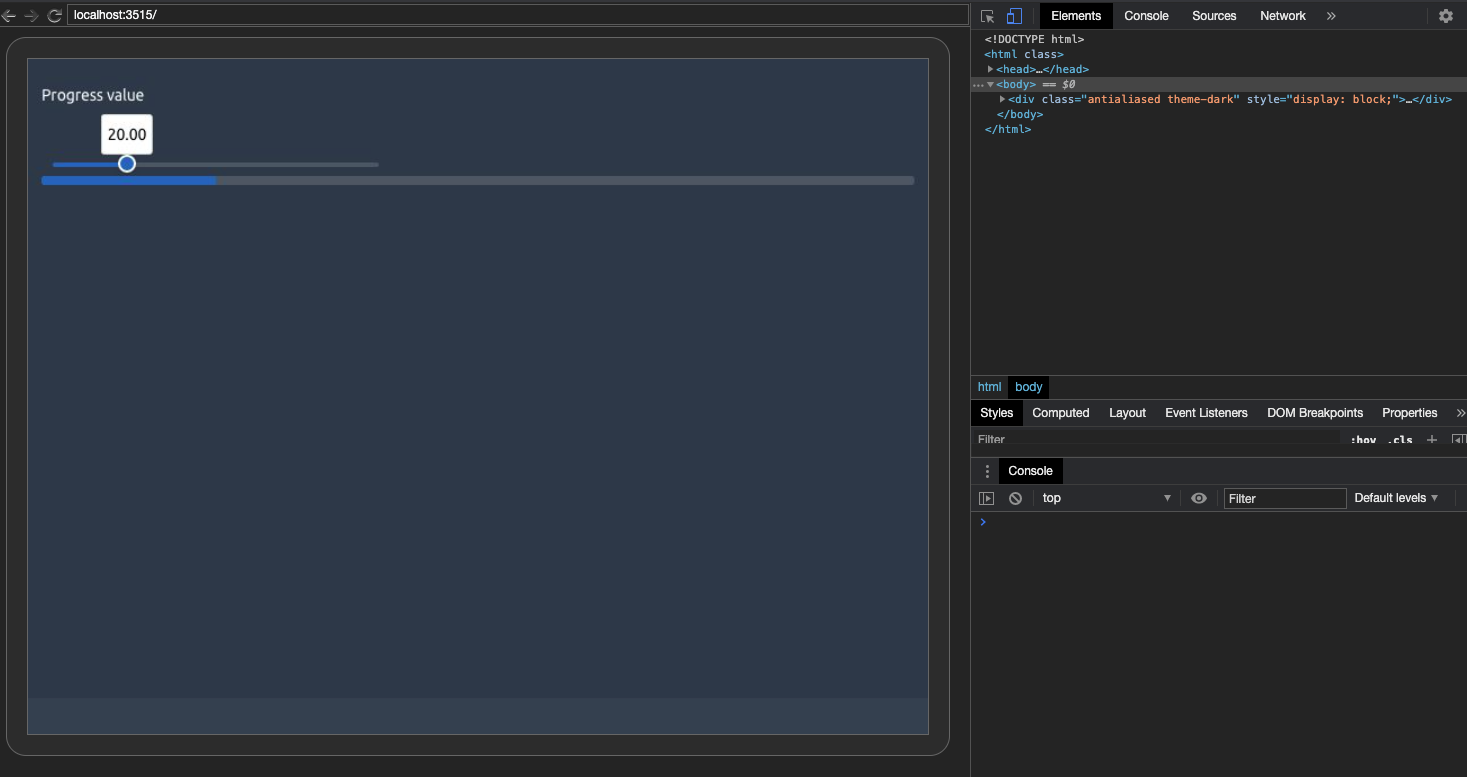
FIGURE 20.1: Tabler progress bar debug tools.
It is now time to write the JS testing logic. We know that moving the slider triggers
the update_tabler_progress() function. This is how we change the slider value,
thanks to the noUiSlider API. We first
select the slider DOM element and call noUiSlider.set on the selected instance:
var slider = document.getElementById('progress_value');
slider.noUiSlider.set(50);
We use call_js() to update the slider value within our testing pipeline (R side):
test$call_js(
  "var slider = document.getElementById('progress_value');
   slider.noUiSlider.set(50);
  "
)
#> ── Launching JS:
#> var slider = document.getElementById('progress_value');
#>     slider.noUiSlider.set(50);
#>     ───────────────────────────────────────────────────
#> Shiny is computing
#> ✔ Shiny is still running
According to Figure 20.2, if the slider is properly updated, the progress bar also seems to have the expected value.
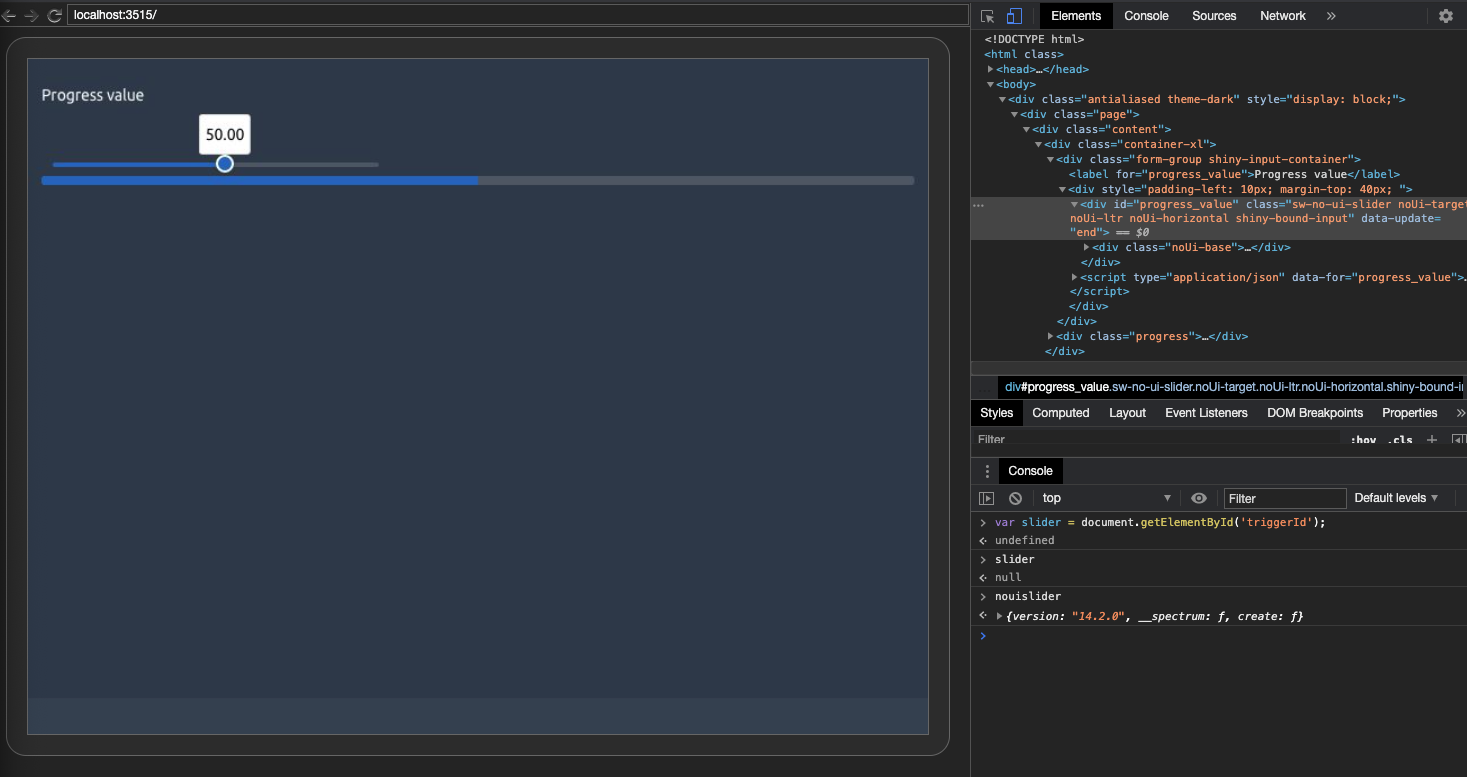
FIGURE 20.2: Updated slider.
We recover the progress value knowing that it is contained in the aria-valuenow
attribute, as a string. We have to convert it to a number with parseInt:
val <- test$call_js(
  "parseInt($('#progress1').attr('aria-valuenow'), 10);
  "
)
#> ── Launching JS:
#> parseInt($('#progress1').attr('aria-valuenow'), 10);
#>     ──────────────────────────────────────────────────
#> Shiny is computing
#> ✔ Shiny is still running
expect_equal(val$result$value, 50)

# Will fail
expect_equal(val$result$value, 30)
#> Error: val$result$value not equal to 30.
#> 1/1 mismatches
#> [1] 50 - 30 == 20

# stop the test whenever satisfied
test$stop()
The test is a success, meaning that update_tabler_progress(), especially the associated
custom message handler, works. This test was simple and did not involve any input elements.
Yet, {crrry} also supports setting input values with shiny_set_input(id, value).
20.2.3 Test input bindings
We decide to add more complexity and show how to test a home-made input binding. We are going to test the Tabler navbar JavaScript logic developed in Chapter 18.3. Before starting to test, we define the expectations:
- If no
tabler_navbar_menu_item()is selected by default, at the start, the first item is selected. It must have theactiveclass on it. Hence, we have to check whether the first<a class="nav-link">has the active class. - Moreover, if one item is selected at start, we have to make sure this item has the
activeclass. - We have to ensure that clicking on another link switches the currently selected link so that the corresponding input on the R side is properly updated.
- When we call
update_tabler_tab_item(), we have to check whether the active link is successfully changed. - Each time a navbar item is active, the corresponding body
tabler_tab_item()must hold theactive showclass, to make sure the tab content is visible. Only one tab may have those classes at a time.
As described above, we run our app in another R process, so as to keep the main process for the test:
p <- processx::process$new(
  "Rscript",
  c(
    "-e",
    "options('shiny.port'= 3515);
    OSUICode::run_example('tabler/update-navbar')"
  )
)

Sys.sleep(2)

p$is_alive()
#> [1] TRUE

test <- CrrryOnPage$new(
  chrome_bin = pagedown::find_chrome(),
  chrome_port = httpuv::randomPort(),
  url = "http://localhost:3515/",
  headless = TRUE
)
#> Running '/Applications/Google Chrome.app/...'
#>   '--no-first-run --headless' \
#>   '--user-data-dir=/Users/david/Library/...' \
#>   '--remote-debugging-port=11028'

test$wait_for_shiny_ready()
#> Shiny is computing
#> ✔ Shiny is still running
After running the above code, browse to localhost:<REMOTE-DEBUGGING-PORT> and you should get what is shown in Figure 20.3.
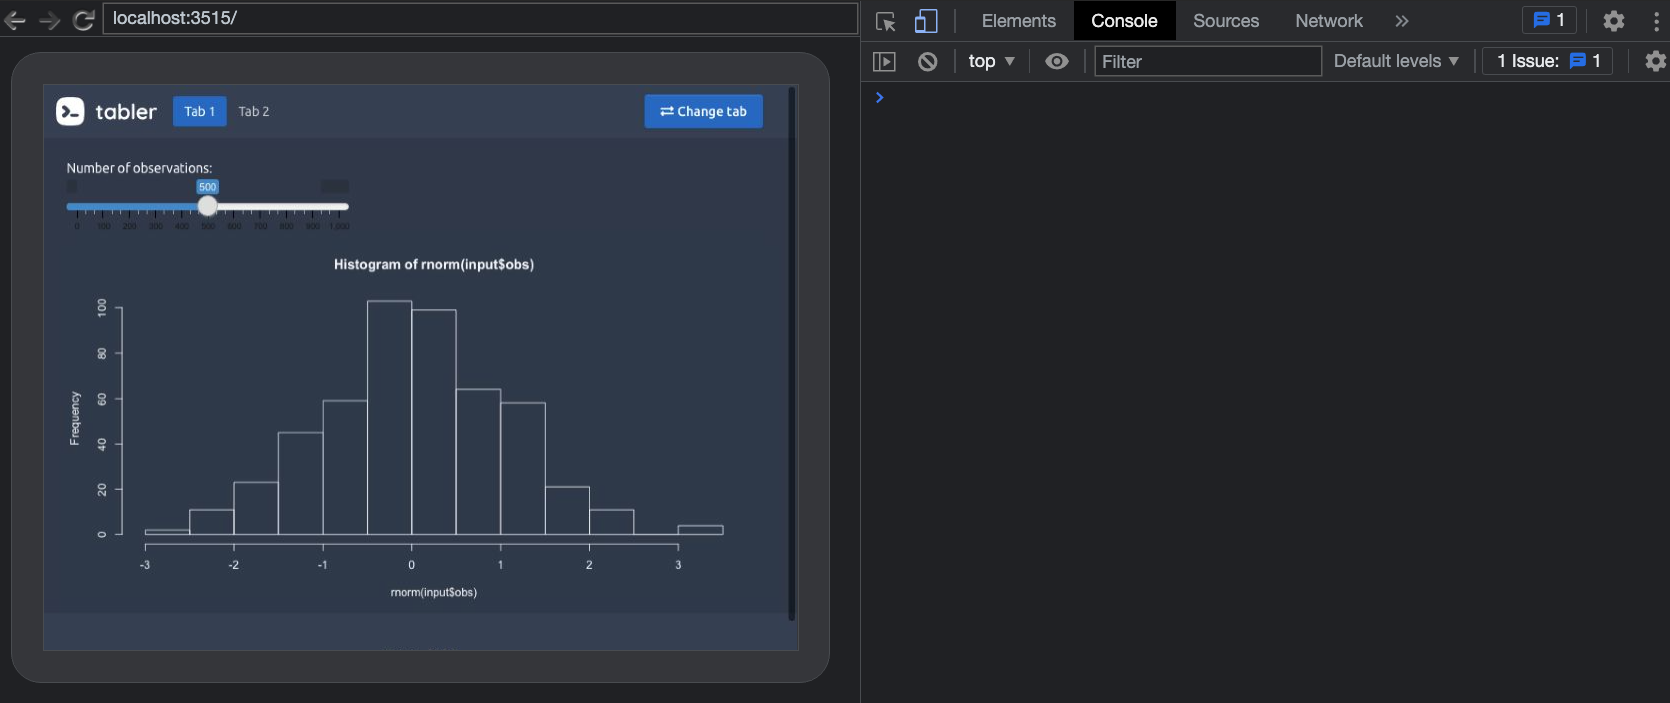
FIGURE 20.3: Tabler navbar example with debug tools.
At start, no link was selected, meaning we expect the first link to be active and shown. The navbar
may be targeted using the navbar-nav class, and we use find to locate the active child, which must
have the nav-link active classes. We also control that only one item is selected by inspecting the length
of the active nav link items. We extract its index with index, which is contained in the data-value attribute:
active <- test$call_js(
  "$('.navbar-nav').find('.nav-link.active').length"
)
#> ── Launching JS:
#>  $('.navbar-nav').find('.nav-link.active').length
#>     ─────────────────────────────────────────────────
#> Shiny is computing
#> ✔ Shiny is still running
expect_equal(active$result$value, 1)

test$wait_for_shiny_ready()
#> Shiny is computing
#> ✔ Shiny is still running

res1 <- test$call_js(
  "$('.navbar-nav')
    .find('.nav-link.active')
    .attr('data-value')"
)
#> ── Launching JS: $('.navbar-nav')
#>     .find('.nav-link.active')
#>     .attr('data-value')
#>     ────────────────────────────────────────────────-
#> Shiny is computing
#> ✔ Shiny is still running
expect_equal(res1$result$value, "tab1")
Now let’s see whether the body tab has the good index. We target the tab-content class and look
for the element having active show classes. We recover its id which contains the tab name:
res2 <- test$call_js(
  "$('.tab-content').find('.active.show').attr('id')"
)
#> ── Launching JS:
#>  $('.tab-content').find('.active.show').attr('id')
#>     ─────────────────────────────────────────────────
#> Shiny is computing
#> ✔ Shiny is still running
expect_equal(res1$result$value, res2$result$value)
We programmatically change the active tab by clicking on the second link, with click. Below we use
.nav-link:eq(1) to select the second link, but we could use .nav-link:not(.active) since
we only have two links. We also recover the index of the selected link and the corresponding tab. If
everything happens well, we expect their value to be 2:
test$call_js("$('.navbar-nav .nav-link:eq(1)').click();")

res3 <- test$call_js(
  "$('.navbar-nav')
    .find('.nav-link.active')
    .attr('data-value')"
)
#> ── Launching JS: $('.navbar-nav')
#>     .find('.nav-link.active')
#>     .attr('data-value')
#>     ─────────────────────────────────────────────────
#> Shiny is computing
#> ✔ Shiny is still running
expect_equal(res3$result$value, "tab2")

test$wait_for_shiny_ready()
#> Shiny is computing
#> ✔ Shiny is still running

res4 <- test$call_js(
  "$('.tab-content')
    .find('.active.show')
    .attr('id')"
)
#> ── Launching JS: $('.tab-content')
#>     .find('.active.show')
#>     .attr('id')
#>     ────────────────────────────────────────────────
expect_equal(res3$result$value, res4$result$value)
We then click on the “change tab” button, which has the update id. The latter,
actually triggers update_tabler_tab_item(). We also want to check its behavior and expect
to be back on tab 1:
test$call_js("$('#update').click();")
#> ── Launching JS: $('#update').click();
#>     ────────────────────────────────────────────────
#> Shiny is computing
#> ✔ Shiny is still running

res5 <- test$call_js(
  "$('.navbar-nav')
    .find('.nav-link.active')
    .attr('data-value')"
)
#> ── Launching JS: $('.navbar-nav')
#>     .find('.nav-link.active')
#>     .attr('data-value')
#>     ────────────────────────────────────────────────
#> Shiny is computing
#> ✔ Shiny is still running
expect_equal(res5$result$value, "tab1")

test$wait_for_shiny_ready()
#> Shiny is computing
#> ✔ Shiny is still running

res6 <- test$call_js(
  "$('.tab-content')
    .find('.active.show')
    .attr('id')"
)
#> Shiny is computing
#> ✔ Shiny is still running
expect_equal(res5$result$value, res6$result$value)
If the test is successful, it means that the receiveMessage and setValue methods
work as expected. We finally test the input value by setting its value to tab2 with shiny_set_input.
All Shiny input values are stored in the Shiny.shinyapp.$inputValues object, as shown in Chapter 13:
test$shiny_set_input("current_tab", "tab2")
#> ── Setting id current_tab with value tab2
#>     ───────────────────────────────────────────────
#> Shiny is computing
#> ✔ Shiny is still running
tab_input <- test$call_js(
  "Shiny.shinyapp.$inputValues.current_tab"
)
#> ── Launching JS: Shiny.shinyapp.$inputValues.current_tab
#>     ───────────────────────────────────────────────
#> Shiny is computing
#> ✔ Shiny is still running
expect_equal(tab_input$result$value, "tab2")
test$stop()
This does not effect the navbar but triggers the notification.
As an exercise, we leave the reader to write a test to check the app behavior when the second tab is active at start.