24 {shinyMobile} and PWA
Transforming a classic Shiny app into a PWA is a game changer for end users. By the end of this chapter, you’ll be able to provide top-notch features for your Shiny apps like:
- Add a fullscreen support.
- Make them installable.
- Support offline capabilities.
Some of the PWA features won’t work with iOS (https://medium.com/@firt/progressive-web-apps-on-ios-are-here-d00430dee3a7), like the install prompt.
As a reminder, the code examples shown throughout this chapter are gathered in the {OSUICode} package accessible here: https://github.com/DivadNojnarg/OSUICode/tree/1d42aa7531705954d3c21921c8bbb10623b20d12, specifically PWA apps are available here: https://github.com/DivadNojnarg/OSUICode/blob/1d42aa7531705954d3c21921c8bbb10623b20d12/inst/shinyMobile/pwa/app.R.
24.1 Introduction
Below, we review one by one the necessary steps to convert a Shiny app to a PWA. To get a good idea of what our mission exactly is, we leverage the Application tab of the developer tools as shown on Figure 24.1. Alternatively, you
may use the Google Lighthouse utility to provide a general diagnosis to the app, as illustrated on Figure 24.2. There are many categories like performance, accessibility. In our case, let’s just select the PWA category, check the mobile device radio and click on generate a report.
According to the diagnostic result displayed in Figure 24.3, we don’t meet all requirements; most importantly there is:
- No manifest.
- No service worker.
- No icons.
- No offline fallback.
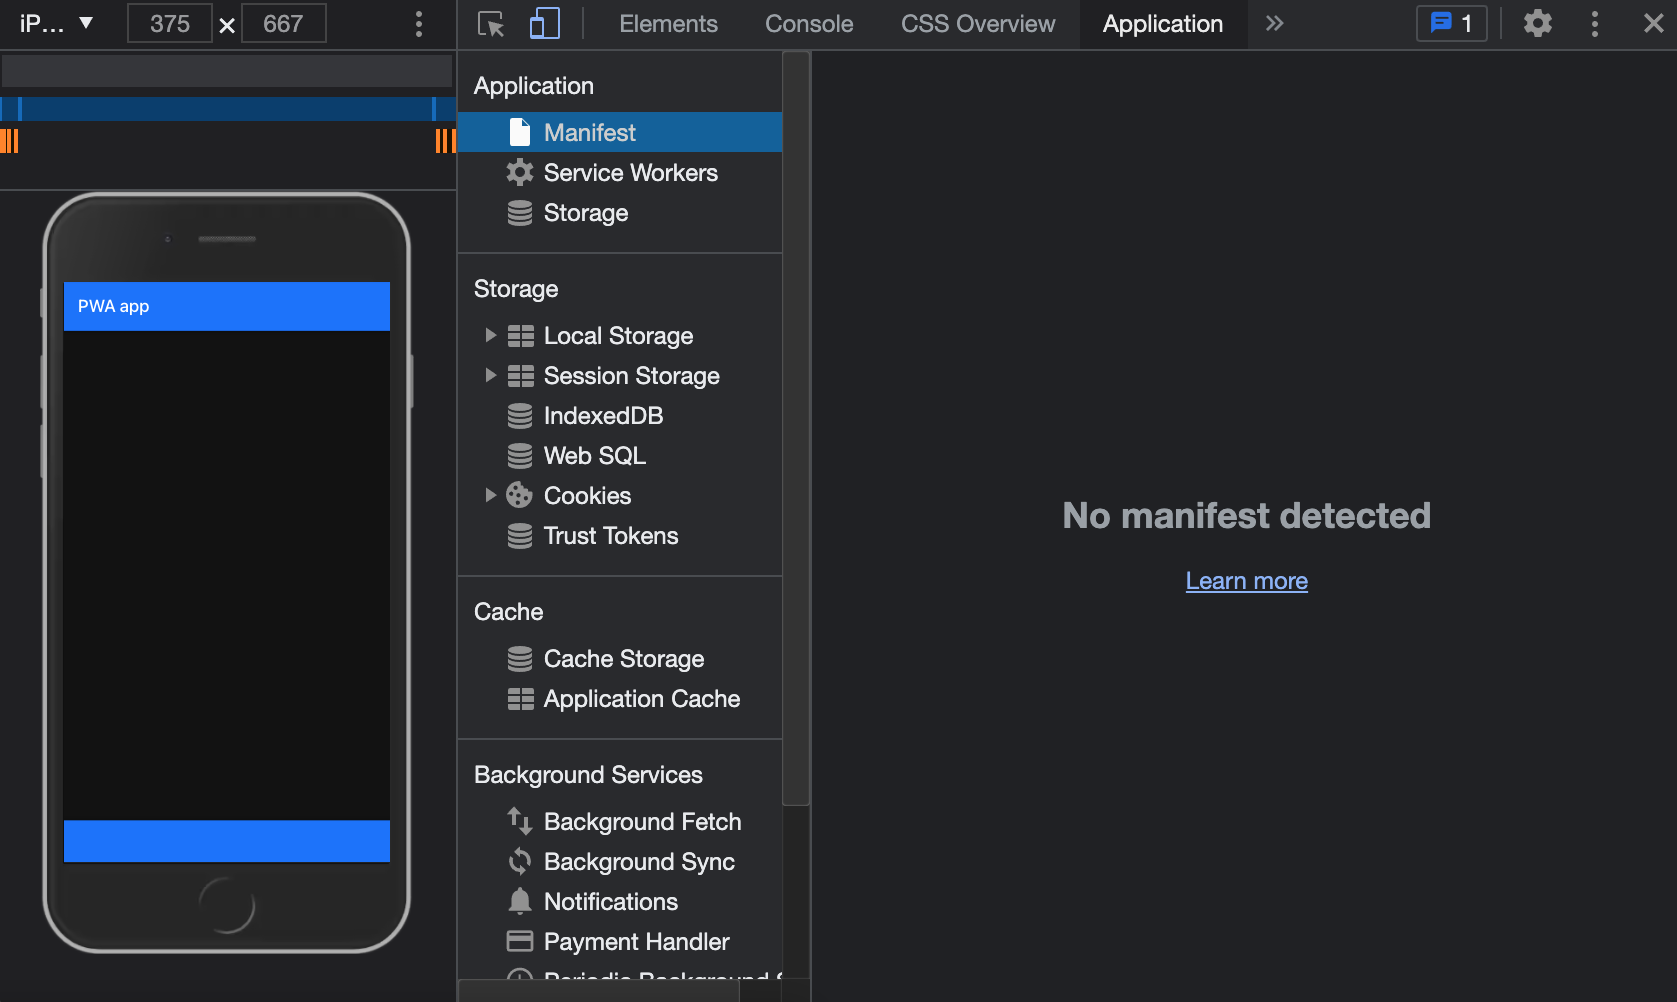
FIGURE 24.1: Application tab of the developers tools.
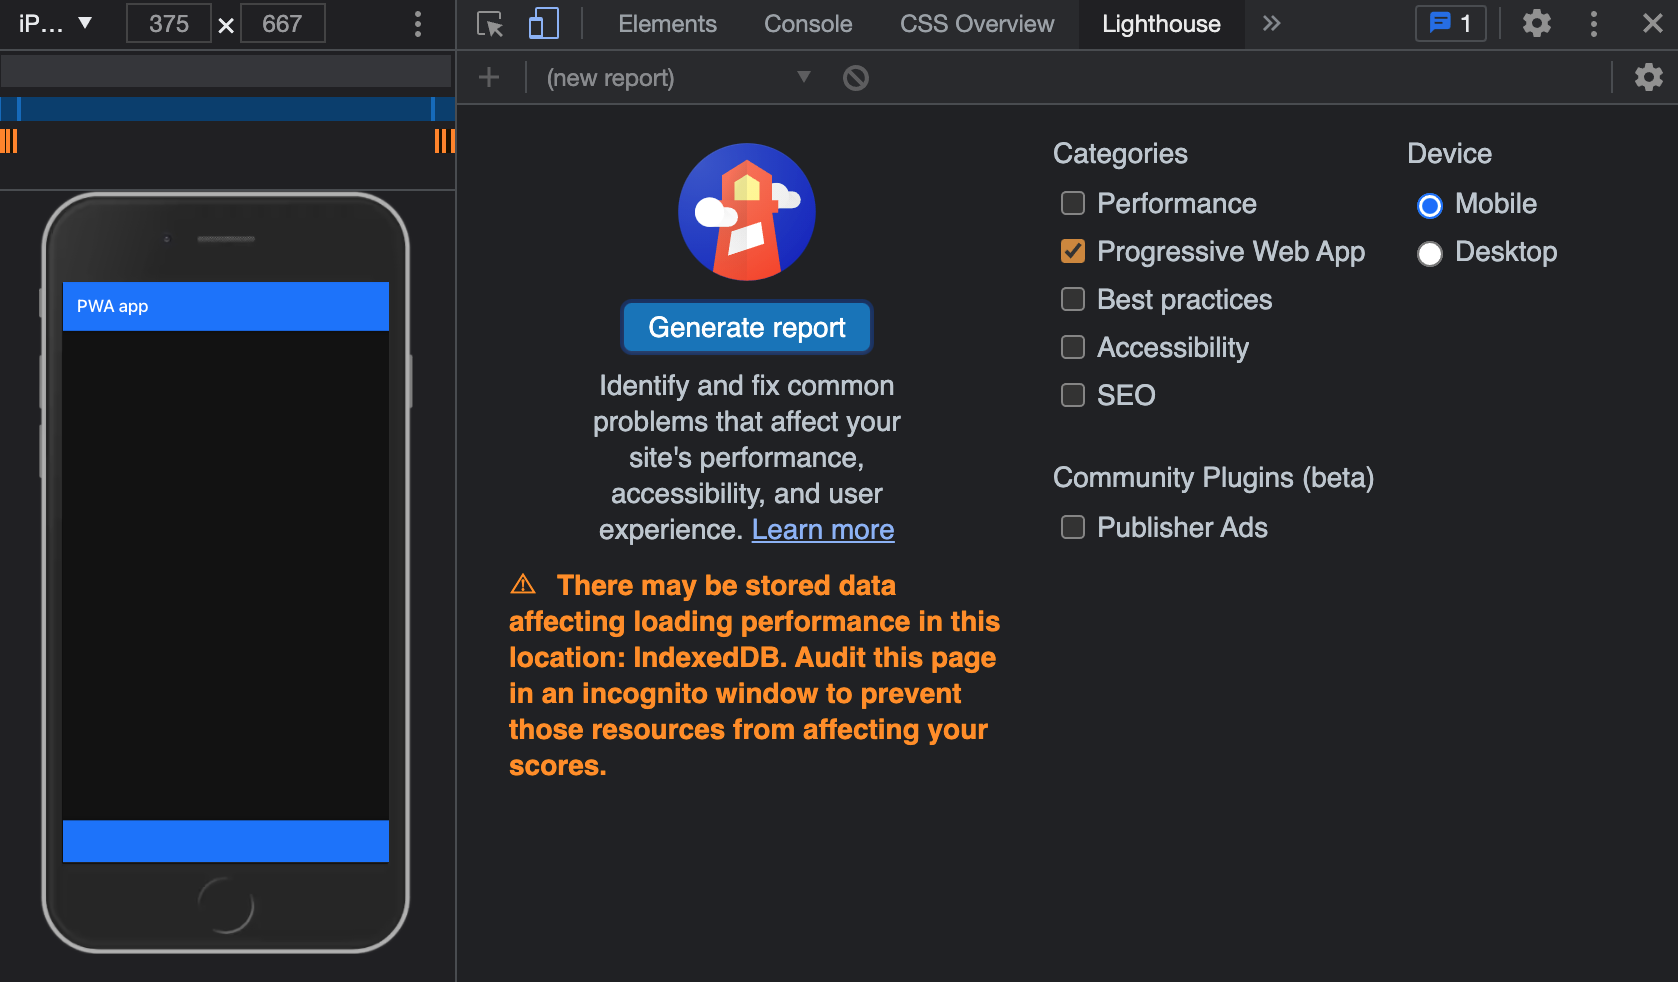
FIGURE 24.2: Google Lightouse utility.
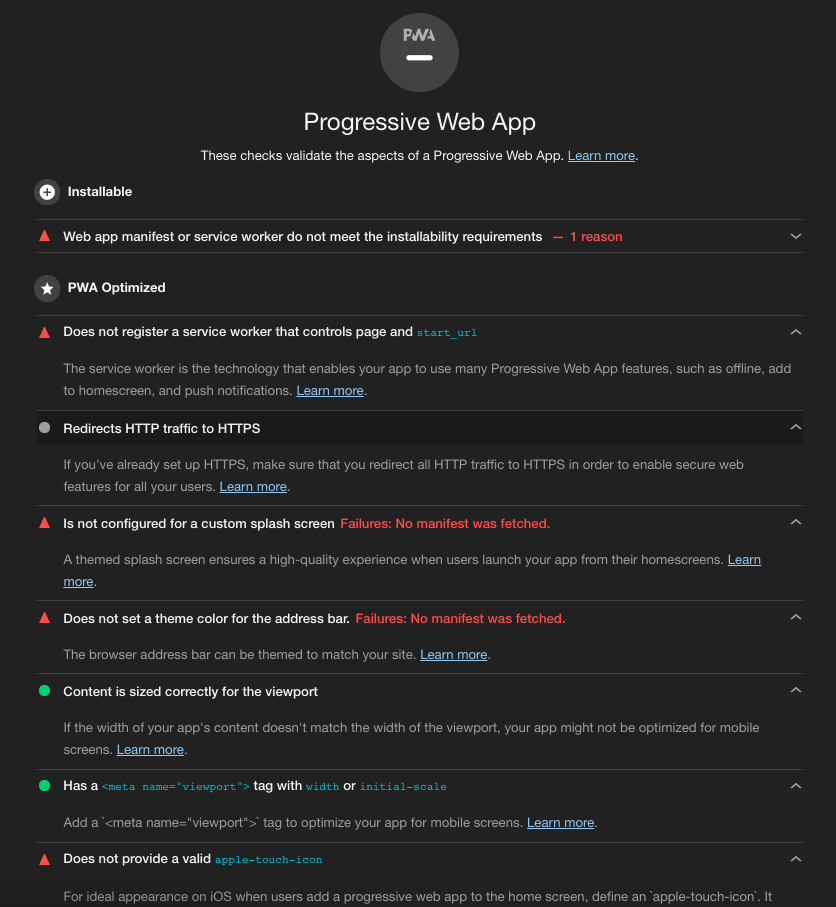
FIGURE 24.3: Lighthouse audit result.
24.2 {charpente} and PWA tools
charpente has tools to help design a PWA, particularly the set_pwa() function, which does all the previously mentioned steps in only one line of code. There are, however, a few prerequisites:
- The app must belong to a package. However, if you followed the previous chapter, this is already the case.
- The function must target the app directory.
Let’s create a inst/examples/pwa-app sub-folder and the app.R file:
library(shiny)
library(shinyMobile)

ui <- f7_page(
  navbar = f7_navbar("PWA App"),
  toolbar = f7_toolbar(),
  title = "shinyMobile"
)

server <- function(input, output, session) {}
shinyApp(ui, server)
Then we set the PWA configuration with set_pwa(). Overall, this function generates a manifest.webmanifest file, downloads the Google PWA compatibility script, adds a custom dependency pointing to the manifest.webmanifest file and a 144x144 icon file, copies a boilerplate service-worker.js with its offline.html page and optionally registers the service worker (whose code is borrowed from web.dev):
window.addEventListener('load', () => {
  if ('serviceWorker' in navigator) {
    var pathname = window.location.pathname;
    navigator.serviceWorker
      .register(
        pathname +
        'service-worker.js',
        { scope: pathname}
      )
      .then(function() {
        console.log('Service Worker Registered');
      });
  };
});
In the shinyMobile case, as Framework7 already registers any provided service
worker, we don’t need that initialization script. Therefore, to skip the creation
of sw-register.js and importing it in main.js, we should actually call:
set_pwa("inst/examples/pwa-app", register_service_worker = FALSE)Importantly, this function does not handle icon creation. There are tools such as appsco and app-manifest, to create those custom icons and splash screens, if you need to.
In the following, we provide more detail about the mentioned steps.
24.2.1 Create the manifest
We would like to create a JSON configuration file like this:
{
  "short_name": "My App",
  "name": "Super amazing app",
  "description": "This app is just mind blowing",
  "icons": [
    {
      "src": "icons/icon.png",
      "type": "image/png",
      "sizes": "192x192"
    }
    // ...
  ],
  "start_url": "<APP_URL>",
  "background_color": "#3367D6",
  "display": "standalone",
  "scope": "/",
  "theme_color": "#3367D6",
  "shortcuts": [
    {
      "name": "Open toast",
      "short_name": "Shortcut",
      "description": "Do something",
      "url": "<APP_URL>/...",
      "icons": [{ "src": "icons/.png", "sizes": "192x192" }]
    }
  ]
}
All fields are following the official recommendation provided by Google regarding the PWA, I do not recommend removing any entry, except the shortcuts, described later. Since the state of the art may slightly change in the future, you are encouraged to regularly check this website to get the latest features.
This file has to be accessible by the app, hence best practice is to put it in the /www folder,
icon images being hosted in the /www/icons sub-directory. The charpente create_manifest() function writes a JSON file at the provided location.
Interestingly the shortcuts fields gives the ability to start the app in a specific state, so that end users save time. This feature is only supported by latest Android devices as well as up-to-date Windows 10 computers (no Apple support). In practice, the shortcut url can be processed by shiny::parseQueryString on the server side. For instance, if the url contains a query string like https://domain/path/?foo=1, we could show a notification:
observeEvent(session$clientData$url_search, {
  query <- parseQueryString(session$clientData$url_search)
  req(length(query) > 0)
  # Ways of accessing the values
  if (as.numeric(query$foo) == 1) {
    f7_notif(text = "Plop")
  }
})
The web manifest and icons have to be included in the head before the Google PWA compatibility script:
<link rel="manifest" href="manifest.webmanifest" />
<!-- include icon also from manifest -->
<link rel="icon" type="image/png"
  href="icons/icon-144.png" sizes="144x144" />
set_pwa() internally calls create_pwa_dependency(), which creates an HTML dependency containing all necessary resources:
#' PWA dependencies utils
#'
#' @description This function attaches PWA manifest and
#' icons to the given tag
#'
#' @param tag Element to attach the dependencies.
#'
#' @importFrom utils packageVersion
#' @importFrom htmltools tagList htmlDependency
#' @export
add_pwa_deps <- function(tag) {
 pwa_deps <- htmlDependency(
  name = "pwa-utils",
  version = packageVersion("shinyMobile"),
  src = c(file = "shinyMobile-0.0.0.9000"),
  head = "<link rel=\"manifest\"
    href=\"manifest.webmanifest\"/>
    <link rel=\"icon\" type=\"image/png\"
    href=\"icons/icon-144.png\" sizes=\"144x144\" />",
  package = "mypkg2",
 )
 tagList(tag, pwa_deps)
}
In practice, since the package already relies on other dependencies like Framework7, we will leverage the add_dependencies() function to add all dependencies at once.
All provided icons must follow the convention icon-<size_in_px>.png like
icon-144.png, which is the default.
24.2.2 Google PWA compatibility
As we use the Google PWA compatibility script, we have to include at least one icon
like <link rel="icon" type="image/png" href="res/icon-128.png" sizes="128x128" />.
However, we found some discrepancies between the developer tools recommendations and the
PWA compatibility script. Therefore, we recommend following the developer tools prescriptions, that
is, to include at least one icon of size 144x144. All other elements are generated by the script itself,
which is convenient. Indeed, having to handle all possible screen sizes and different OS is particularly
tricky, repetitive, and not interesting.
The HTML dependency is downloaded with create_dependency("pwacompat", options = charpente_options(bundle = FALSE)).
Don’t forget to update the add_dependencies() call in f7_page() by including the two new dependencies, that is pwa and pwacompat:
f7_page <- function(..., navbar, toolbar, title = NULL,
                    options = NULL) {

  # Config tag (unchanged)

  # Body tag (unchanged)

  tagList(
    tags$head(
      # Head content (unchanged)
    ),
    add_dependencies(
      body_tag,
      deps = c("framework7", "shinyMobile", "pwa", "pwacompat")
    )
  )
}
Calling devtools::load_all() and running the app again, you should see the new dependencies
in the head (Figure 24.4).
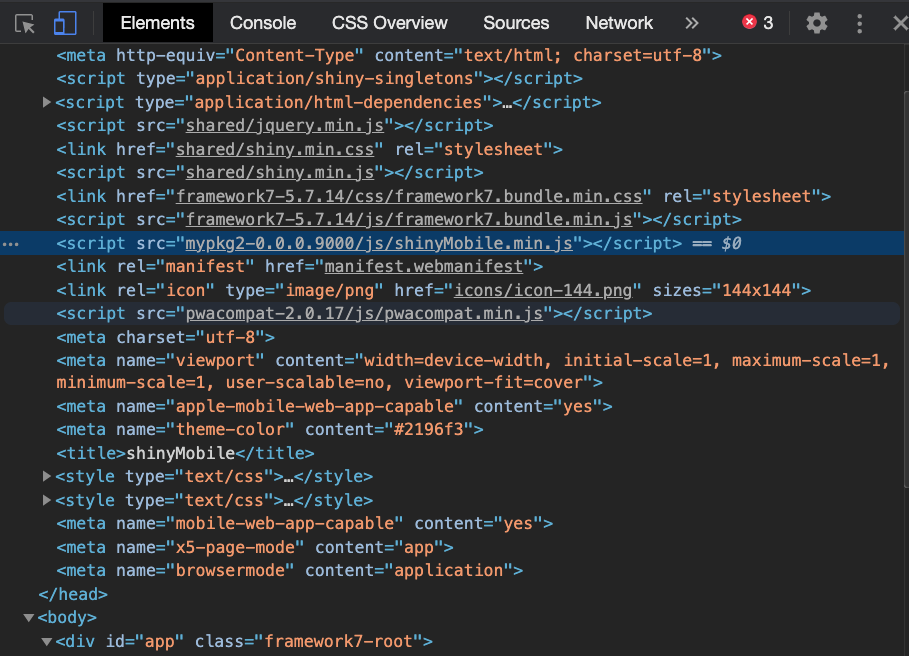
FIGURE 24.4: New PWA dependencies in the head tag.
Yet, according to Figure 24.5, we still miss the service worker, as shown in the manifest diagnostic. This demonstrates how powerful the developer tools are as the end user is always guided step by step.
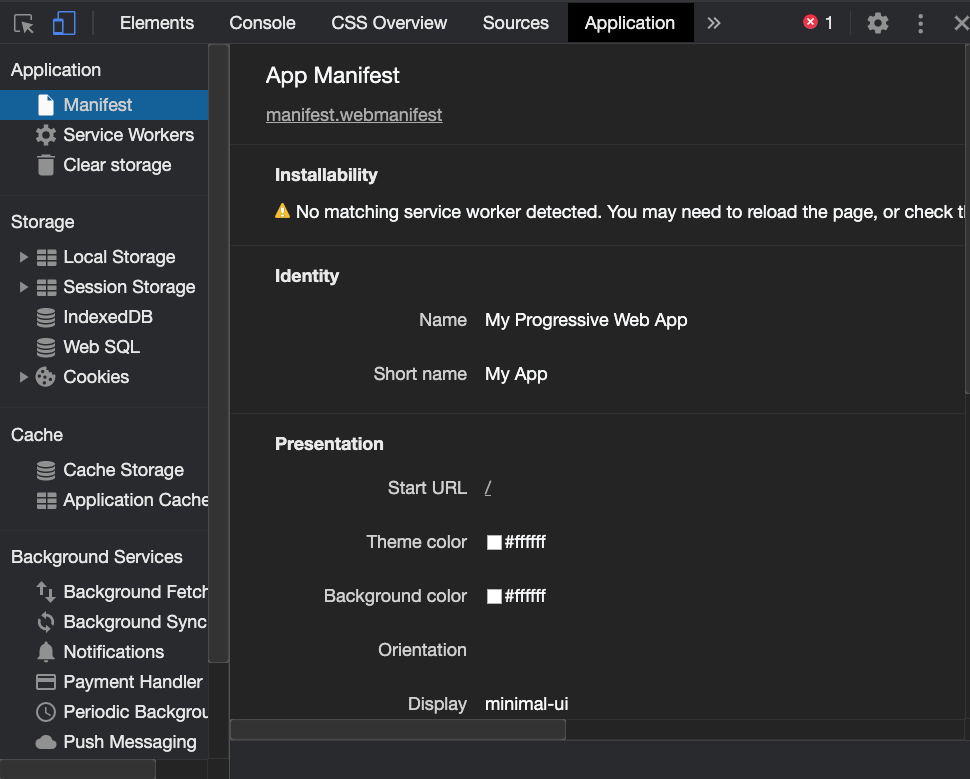
FIGURE 24.5: Missing service worker registration.
24.2.3 Service worker and offline page
The second mandatory step to make our app installable is the service worker.
We borrowed and modified the code from web.dev. set_pwa() copies this code in the the provided app /www folder:
// Incrementing OFFLINE_VERSION will kick off the install
// event and force previously cached resources to be
// updated from the network.
const OFFLINE_VERSION = 1;
const CACHE_NAME = 'offline';
// Customize this with a different URL if needed.
const OFFLINE_URL = 'offline.html';

self.addEventListener('install', (event) => {
  // Install logic
});

self.addEventListener('activate', (event) => {
  // Activate logic
});

self.addEventListener('fetch', (event) => {
  // Fetch logic
});
This service worker is composed of three steps, which we succinctly describe below.
24.2.3.1 Installation
During the installation step, the cache is initialized and assets like HTML page (offline.html), CSS, JS and images are asynchronously cached. Assets’s respective path is taken from the server location, for instance, Framework7 assets are located in framework7-5.7.14/... and jQuery assets in shared/. Best practice is to look at the developer tools Source tab, which provides the right location.
self.addEventListener('install', (event) => {
  event.waitUntil(
    (async () => {
      const cache = await caches.open(CACHE_NAME);
      await cache.add(
        new Request(OFFLINE_URL, { cache: 'reload' })
      );
      // Cache other assets ...
    })()
  );
  // Force the waiting service worker to become
  // the active service worker.
  self.skipWaiting();
});
24.2.3.2 Activation
This step ensures that the service worker boots. As the service worker boot-up time may be delayed (until 0.5 s), the navigation preload feature guaranties to have reasonable performances by making network requests in parallel of the booting process. In sum, don’t touch this code.
self.addEventListener('activate', (event) => {
  event.waitUntil(
    (async () => {
      // Enable navigation preload if it's supported.
      // Speeds up
      if ('navigationPreload' in self.registration) {
        await self.registration.navigationPreload.enable();
      }
    })()
  );

  // Tell the active service worker to take control of
  // the page immediately.
  self.clients.claim();
});
24.2.3.3 Fetch
Once active, the service worker intercepts all network requests sent by the client and returns answers according to a predefined strategy. Here we set the “network first” strategy, meaning we always try to return an answer from the network and fall back to the cache if the request failed (for instance, in case of missing internet connection). In the above code, there are two kind of requests: navigation, which is related to an HTML page, and other requests corresponding to static assets like CSS or JS. Therefore, we have an if and else statement to consider those two cases. If you would like to know more about caching strategies please refer to the Google documentation: https://developers.google.com/web/tools/workbox/modules/workbox-strategies.
// Fix service-worker bug
if (event.request.cache === 'only-if-cached') return;

// We only want to call event.respondWith() if this
// is a navigation request for an HTML page ...
if (event.request.mode === 'navigate') {
  // Navigation request
} else {
  // Other requests
}
Below is the navigation request logic, which is what will be triggered each time an end-user points to your app. As stated above, if the navigation preload is available, we return the preload response. If not, the request is fetched. In case of failure, we fall back to the offline HTML page, cached during the installation step.
// Navigation request logic
event.respondWith(
  (async () => {
    try {
      // First, try to use the navigation preload response
      // if it's supported.
      const preloadResponse = await event.preloadResponse;
      if (preloadResponse) {
        return preloadResponse;
      }

      // Always try the network first.
      const networkResponse = await fetch(event.request);
      return networkResponse;
    } catch (error) {
      console.log('Returning offline page instead.', error);

      const cache = await caches.open(CACHE_NAME);
      const cachedResponse = await cache.match(OFFLINE_URL);
      return cachedResponse;
    }
  })()
);
All other requests are handled in the else statement. The logic remains the same. We first try to get assets from the network and fallback to the cache upon error, that is for instance in offline mode.
// Other requests
event.respondWith(
  (async () => {
    try {
      // Always try the network first.
      const networkResponse = await fetch(event.request);
      return networkResponse;

    } catch (error) {

      const cache = await caches.open(CACHE_NAME);
      const cachedResponse = await cache.match(event.request);
      if (cachedResponse) return cachedResponse;

    }
  })()
);
To sum up, this service worker redirects the end user to the offline cached page (offline.html) whenever the app is offline, thereby offering a better user experience. The full code is located here.
We strongly advise keeping the same file names.
24.2.3.4 Registration
The next step involves the service worker registration. Framework7 has a dedicated module in the app configuration. We modify the config in helpers_config.js before initializing the app and run build_js() to update the minified file:
config.serviceWorker = {
  path: window.location.pathname + 'service-worker.js',
  scope: window.location.pathname
};
If the process is successful, you get the result shown in Figure 24.6.
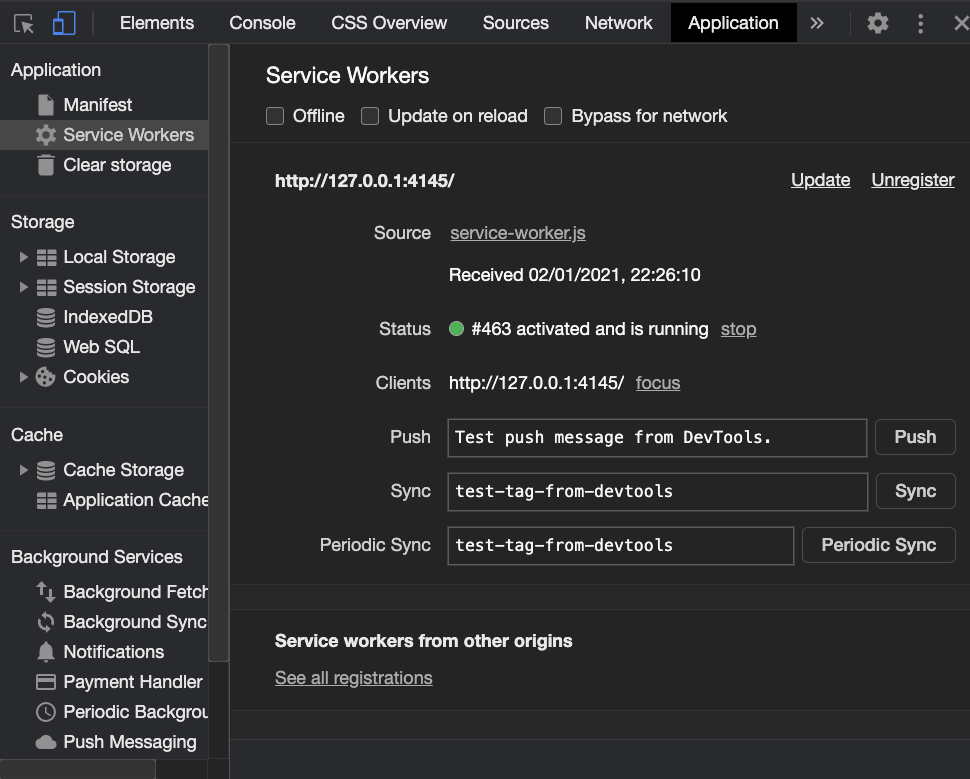
FIGURE 24.6: Registered service worker.
At this point, you should also check whether the service worker was able to cache files by inspecting the cache storage section, as depicted by Figure 24.7.
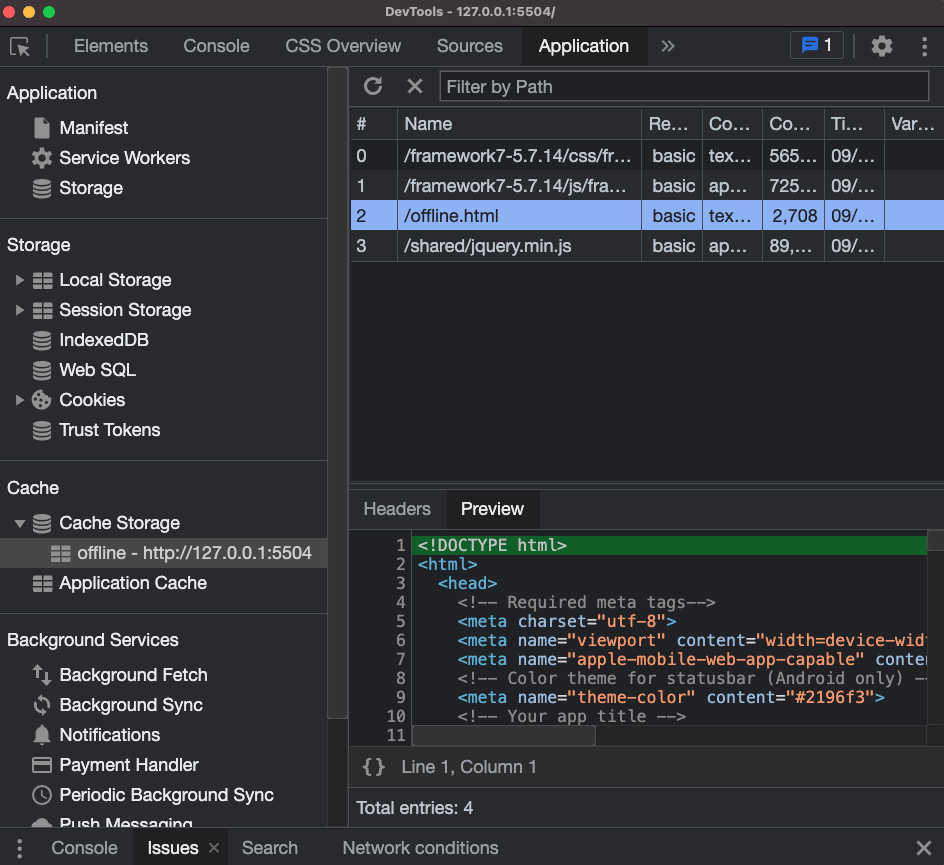
FIGURE 24.7: Service worker caches static assets to make them available offline.
24.2.3.5 Offline fallback
The new PWA standard imposes returning a valid response when the app is offline. The offline page is also copied from charpente and below is a summarized version:
<!DOCTYPE html>
<html>
  <head>
    <!-- Required meta tags ... -->
    <link
      rel="stylesheet"
      href="framework7-5.7.14/css/framework7.bundle.min.css">
  </head>
  <body>
    <div id="app">
      <!-- App content (navbar, toolbar, page, ...) -->
    </div>
    <script type="text/javascript" src="shared/jquery.min.js">
    </script>
    <script
      type="text/javascript"
      src="framework7-5.7.14/js/framework7.bundle.min.js">
    </script>
    <!-- Path to your app js -->
    <script>
      var app = new Framework7({
        // ...
      });
      // ...
    </script>
  </body>
</html>
Notice that jQuery, required for easier DOM interactions, as well as Framework7 CSS and JS assets are cached in the above service worker script, thereby making them
available to offline.html. This offline fallback relies on Framework7 for consistency reasons but could be replaced by any other HTML page. The whole code is stored here.
Now, let’s audit our app again: congrats! It is installable and reliable, although further PWA optimization may be provided.
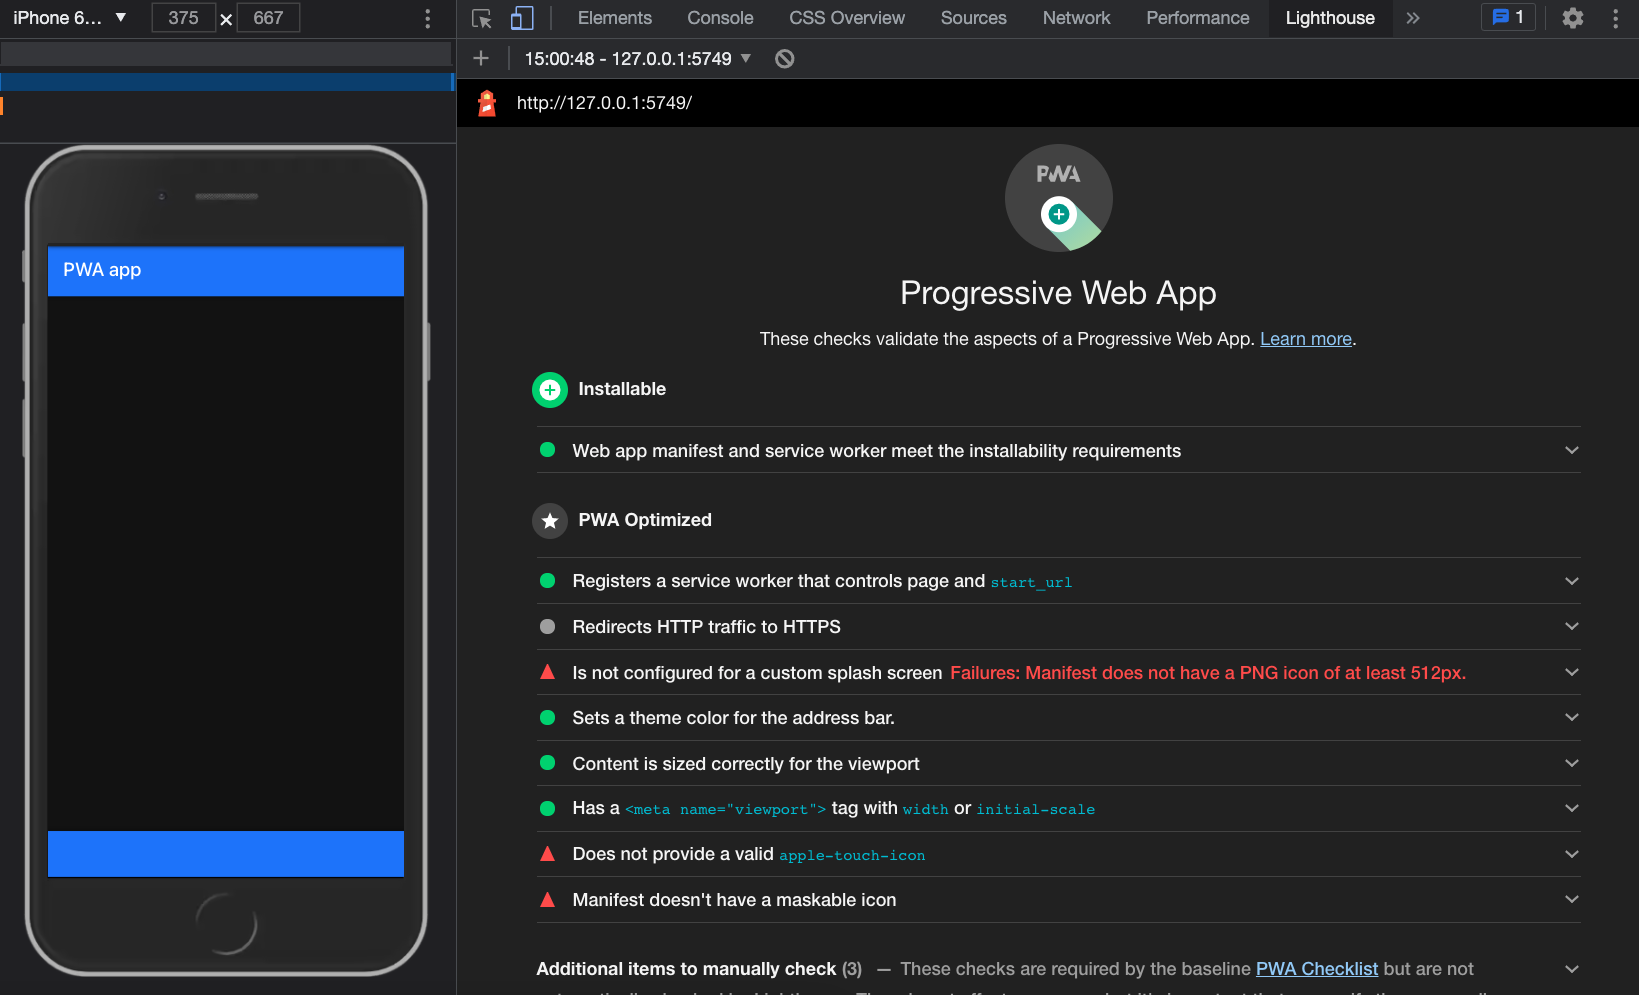
FIGURE 24.8: Installable shinyMobile app.
A common source of error is the browser cache. It is best practice to regularly empty it. Alternatively, you may run in incognito mode, which does not cache files.
24.2.4 Disable PWA for the end user
With the above approach, shinyMobile will always look for a service worker to register.
Particularly, this would raise an error in case no service worker is found on the server.
What if the user doesn’t want to create a PWA, let’s say for less important applications?
We may add a parameter to f7_page(), for instance allowPWA, that is either TRUE or FALSE and store its value in the body data-pwa attribute.
f7_page <- function(..., navbar, toolbar, title = NULL,
                    options = shinyMobile_options,
                    allowPWA = TRUE) {

  # ... unchanged

  # create body_tag
  body_tag <- tags$body(
    `data-pwa` = tolower(allowPWA),
    tags$div(
      id = "app",
      # ... unchanged
    )
  )

  # ... unchanged
}
We recover it on the JS side within helpers_config.js:
// check if the app is intended to be a PWA
let isPWA = $('body').attr('data-pwa') === 'true';

if (isPWA) {
  config.serviceWorker = {
    path: window.location.pathname + 'service-worker.js',
    scope: window.location.pathname
  };
}
It only creates config.serviceWorker if the user specifies allowPWA = TRUE.
24.3 Handle the installation
It is a great opportunity to propose a custom installation experience.
To be able to install the app, make sure to replace start_url by the url
where the app is deployed like https://dgranjon.shinyapps.io/installable-pwa-app/ for instance.
Missing that step would cause an issue during the service worker registration.
We create a new script with create_js("helpers_pwa") and export the setPWA function:
export const setPWA = (app) => {
  // Install logic
};
Once the installation criteria are met, the web browser raises the beforeinstallprompt event (except
on the iOS platform, which is not compatible yet). We add an event listener inside setPWA:
let deferredPrompt;
window.addEventListener('beforeinstallprompt', (e) => {
  // Prevent the mini-infobar from appearing on mobile
  e.preventDefault();
  // Stash the event so it can be triggered later.
  deferredPrompt = e;
});
This code adds an event listener to the window, prevents it from showing at start with e.preventDefault and
captures it in an external variable called deferredPrompt.
The next step comprises the design of our custom piece of UI, which will trigger the prompt install. We can benefit from the rich Framework7 interface and display
a toast containing an install button. The initialization
is fairly simple, following the pattern app.<COMPONENT>.create(parameters):
// Create custom install UI
let installToast = app.toast.create({
  position: 'center',
  text: `<button
    id="install-button"
    class="toast-button button color-green">
    Install
  </button>`
});
We give it an id so as to call it later and edit the beforeinstallprompt event listener to show the toast:
let deferredPrompt;
window.addEventListener('beforeinstallprompt', (e) => {
  // Prevent the mini-infobar from appearing on mobile
  e.preventDefault();
  // Stash the event so it can be triggered later.
  deferredPrompt = e;
  // Show install trigger
  installToast.open();
});
With jQuery like $(window).on('beforeinstallprompt', ...), we would capture the event with e.originalEvent.
We register a second event listener, which fires on the toast button click. We first close the
toast, call the prompt method on the deferred event and log the result:
app.utils.nextTick(function() {
  $('#install-button').on('click', function() {
    // close install toast
    installToast.close();
    if (!deferredPrompt) {
      // The deferred prompt isn't available.
      return;
    }
    // Show the install prompt.
    deferredPrompt.prompt();
    // Log the result
    deferredPrompt.userChoice.then((result) => {
      console.log('OK', 'userChoice', result);
      // Reset the deferred prompt variable, since
      // prompt() can only be called once.
      deferredPrompt = null;
    });
  });
}, 500);
Inside init.js, we add our brand new module:
import { setConfig } from './helpers_config.js';
import { initTheme } from './helpers_theme.js'
import { setPWA } from './helpers_pwa.js'
// other imports ...
$( document ).ready(function() {
  let config = setConfig();
  // create app instance
  app = new Framework7(config);
  // Set theme: dark mode, touch, filled, color, taphold css
  initTheme(config, app);
  // PWA setup
  setPWA(app);
});
We run build_js() and deploy the app to shinyapps.io (remember, we must serve the app under HTTPS). Figure 24.9
illustrates the install prompt window that appears to install the app. Once installed, the beforeinstallprompt
event does not fire anymore and the app may be launched as a standalone app, for instance on macOSX (Figure 24.10).
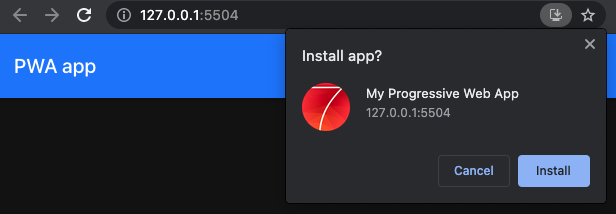
FIGURE 24.9: Install prompt window.
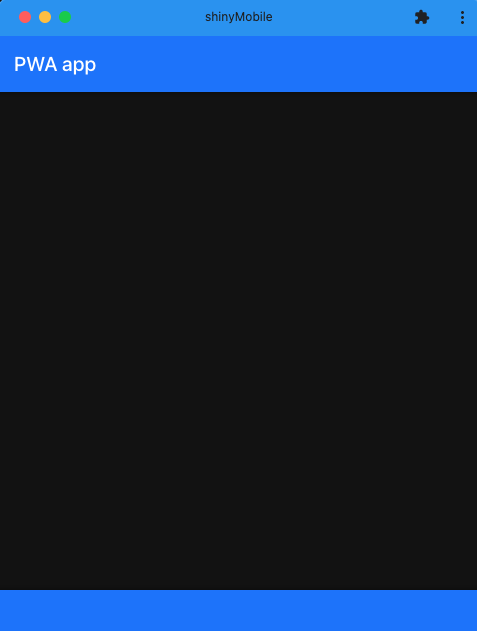
FIGURE 24.10: Installed PWA on macOSX.
In Figure 24.10, the blue window color corresponds to the tags$meta(name = "theme-color", content = "#2196f3"), passed in the f7_page() layout element. To simulate a network issue and validate the offline mode, we selected the developer tools Network tab and changed the dropdown value to offline. As shown in Figure 24.11, the offline template shows and pulls static assets from the service worker (the failed network requests are shown in red).
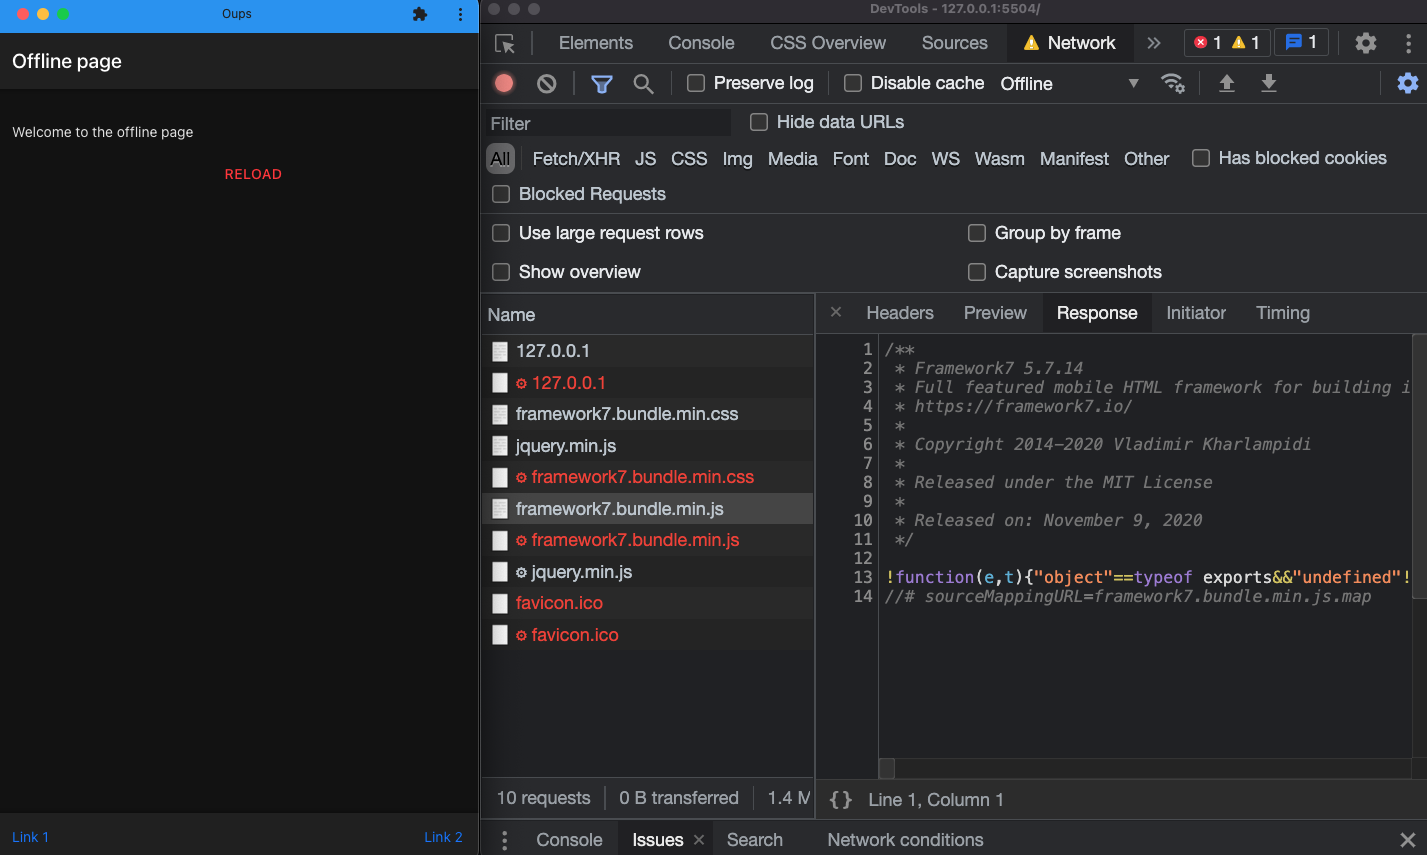
FIGURE 24.11: Offline HTML template.
The final product may be run with:
### RUN ###
# OSUICode::run_example(
#  "shinyMobile/pwa",
#   package = "OSUICode"
# )

### APP CODE ###
library(shiny)
library(OSUICode)

ui <- f7_page(
  navbar = f7_navbar("PWA App"),
  toolbar = f7_toolbar(),
  title = "shinyMobile"
)

server <- function(input, output, session) {
  session$allowReconnect("force")
}

shinyApp(ui, server)
This chapter was part of a workshop available here.
24.4 Other resources
The process described above works perfectly for any Shiny template. The reader may also consider other packages like {shiny.pwa}, that creates a PWA-compatible structure at run time, within the app /www folder.