13 Shiny inputs lifecycles
In the following, we provide an integrated view of the Shiny input system by summarizing all mechanisms seen since Chapter 11.
13.1 App initialization
When a Shiny app starts, Shiny runs initShiny on the client. This JS function has three main tasks:
- Bind all inputs and outputs.
-
Initialize all inputs (if necessary) with
initializeInputs. - Initialize the client websocket connection mentioned in Chapter 11 and send initial values to the server.
Most input bindings are, in principle, bundled in the shiny package. Some may be user-defined like in shinyMobile or even in a simple Shiny app. In any case, they are all contained in a binding registry, namely inputBindings built on top the following class:
var BindingRegistry = function() {
  this.bindings = [];
  this.bindingNames = {};
}
This class has a method to register a binding. This method is executed when calling Shiny.inputBindings.register(myBinding, 'reference');, which appends the newly created binding to the bindings array.
When Shiny starts, it has to find all defined bindings with the getBindings method.
Once done, for each binding, find is triggered. If no corresponding element is found in the DOM, nothing is done. For each found input, the following methods are triggered:
-
getIdreturns the input id. This ensures the uniqueness and is critical. -
getTypeoptionally handles anyregisterInputHandlerdefined by the user on the R side. A detailed example is shown in section 12.4. -
getValuegets the initial input value. -
subscriberegisters event listeners driving the input behavior.
The data attribute shiny-input-binding is then added. This allows Shiny to access the input binding methods from the client, as shown in section 12.1.4. The shiny-bound-input class is added, the corresponding input is appended to the boundInputs object (listing all bound inputs) and shiny:bound triggered on the client. As a side note, if you recall the Shiny.unbinAll() method from sections 12.1 and 12.1.3, it triggers the shiny:unbound event for all inputs as well as removes them from the boundInputs registry.
Once done, Shiny stores all initial values in a variable initialInput, also containing all client data and passes them to the Shinyapp.connect method. As shown in Chapter 11, the latter opens the client websocket connection, raises the shiny:connected event and sends all values to the server (R). A few time after, shiny:sessioninitialized is triggered.

FIGURE 13.1: What Shiny does client side on initialization.
In Chapter 11, we briefly described the Shiny JavaScript object. As an exercise, let’s explore what the Shiny.shinyApp object contains. The definition is located in the shinyapps.js script.
var ShinyApp = function() {
  this.$socket = null;
  // Cached input values
  this.$inputValues = {};
  // Input values at initialization (and reconnect)
  this.$initialInput = {};
  // Output bindings
  this.$bindings = {};
  // Cached values/errors
  this.$values = {};
  this.$errors = {};
  // Conditional bindings
  // (show/hide element based on expression)
  this.$conditionals = {};
  this.$pendingMessages = [];
  this.$activeRequests = {};
  this.$nextRequestId = 0;
  this.$allowReconnect = false;
};
It creates several properties; some of them are easy to guess like inputValues or initialInput. Let’s run the example below and open the HTML inspector. Notice that the sliderInput is set to 500 at t0 (initialization):
ui <- fluidPage(
  sliderInput(
    "obs",
    "Number of observations:",
    min = 0,
    max = 1000,
    value = 500
  ),
  plotOutput("distPlot")
)

server <- function(input, output, session) {
  output$distPlot <- renderPlot({
    hist(rnorm(input$obs))
  })
}
shinyApp(ui, server)
Figure 13.2 shows how to access Shiny’s initial input value with Shiny.shinyapp.$initialInput.obs. After changing the slider position, its value is given by Shiny.shinyapp.$inputValues.obs. $initialInput and $inputValues contain many more elements, however we are only interested in the slider function in this example.
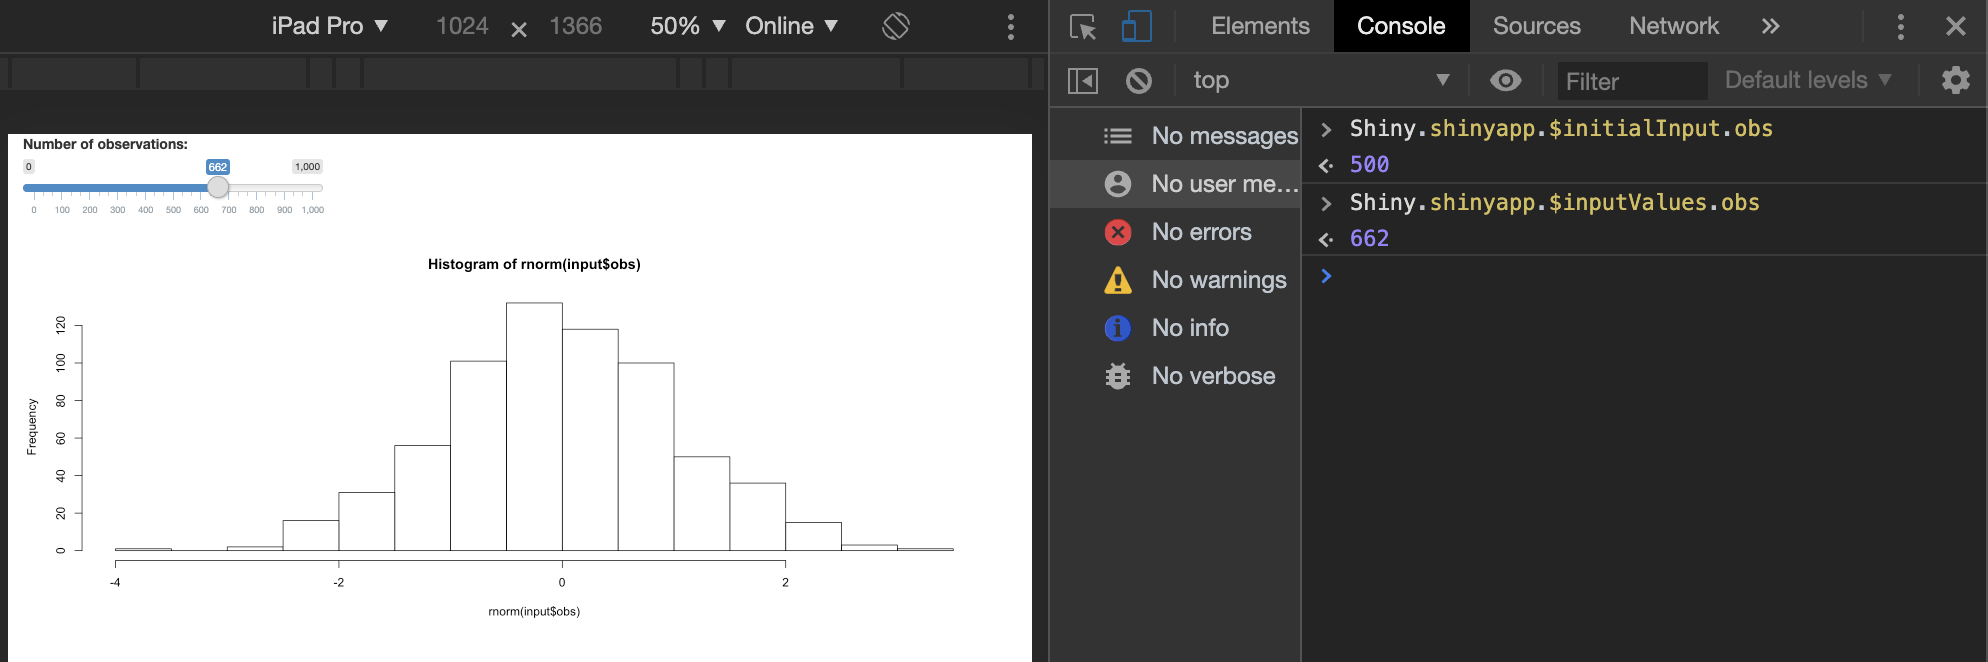
FIGURE 13.2: Explore initial input values.
13.2 Update input
Below we try to explain what are the mechanisms to update an input from the server on the client. As stated previously, it all starts with an update<name>Input function call, which actually sends a message through the current session. This message is received by the client websocket message manager:
socket.onmessage = function(e) {
  self.dispatchMessage(e.data);
};
which sends the message to the appropriate handler, that is inputMessages:
addMessageHandler('inputMessages', function(message) {
  // inputMessages should be an array
  for (var i = 0; i < message.length; i++) {
    var $obj = $('.shiny-bound-input#' + $escape(message[i].id));
    var inputBinding = $obj.data('shiny-input-binding');

    // Dispatch the message to the appropriate input object
    if ($obj.length > 0) {
      var el = $obj[0];
      var evt = jQuery.Event('shiny:updateinput');
      evt.message = message[i].message;
      evt.binding = inputBinding;
      $(el).trigger(evt);
      if (!evt.isDefaultPrevented())
        inputBinding.receiveMessage(el, evt.message);
    }
  }
});
In short, it gets the inputId and accesses the corresponding input binding. Then it triggers the shiny:updateinput event and calles the input binding receiveMessage method. This fires setValue and subscribe. The way subscribe works is not really well covered in the official documentation.
The callback function is actually defined during the initialization process:
function valueChangeCallback(binding, el, allowDeferred) {
  var id = binding.getId(el);
  if (id) {
    var value = binding.getValue(el);
    var type = binding.getType(el);
    if (type)
      id = id + ':' + type;

    let opts = {
      priority: allowDeferred ? 'deferred' : 'immediate',
      binding: binding,
      el: el
    };
    inputs.setInput(id, value, opts);
  }
}
valueChangeCallback ultimately calls inputs.setInput(id, value, opts). The latter involves a rather complex chain of reactions (which is not described here). It is important to understand that the client does not send input values one by one, but by batch:
### RUN ###
# OSUICode::run_example(
#  "inputs-lifecycle/event-message",
#   package = "OSUICode"
# )

### APP CODE ###
library(shiny)

ui <- fluidPage(
  tags$script(
    HTML("$(document).on('shiny:message', function(event) {
      console.log(event.message);
    });")
  ),
  actionButton("go", "update"),
  textInput("test", "Test1"),
  textInput("test2", "Test2")
)

server <- function(input, output, session) {
  observeEvent(input$go, ignoreInit = TRUE, {
    updateTextInput(session, "test", value = "111")
    updateTextInput(session, "test2", value = "222")
  })
}

shinyApp(ui, server)
Overall, the result is stored in a queue, namely pendingData, and sent to the server with shinyapp.sendInput:
this.sendInput = function(values) {
  var msg = JSON.stringify({
    method: 'update',
    data: values
  });

  this.$sendMsg(msg);

  $.extend(this.$inputValues, values);

  // ....; Extra code removed
}
The message has an update tag and is sent through the client websocket, only if the connection is opened. If not, it is added to the list of pending messages.
this.$sendMsg = function(msg) {
  if (!this.$socket.readyState) {
    this.$pendingMessages.push(msg);
  }
  else {
    this.$socket.send(msg);
  }
};
Finally, current inputValues are updated. On the server side, the new value is received
by the server websocket message handler, that is ws$onMessage(message).
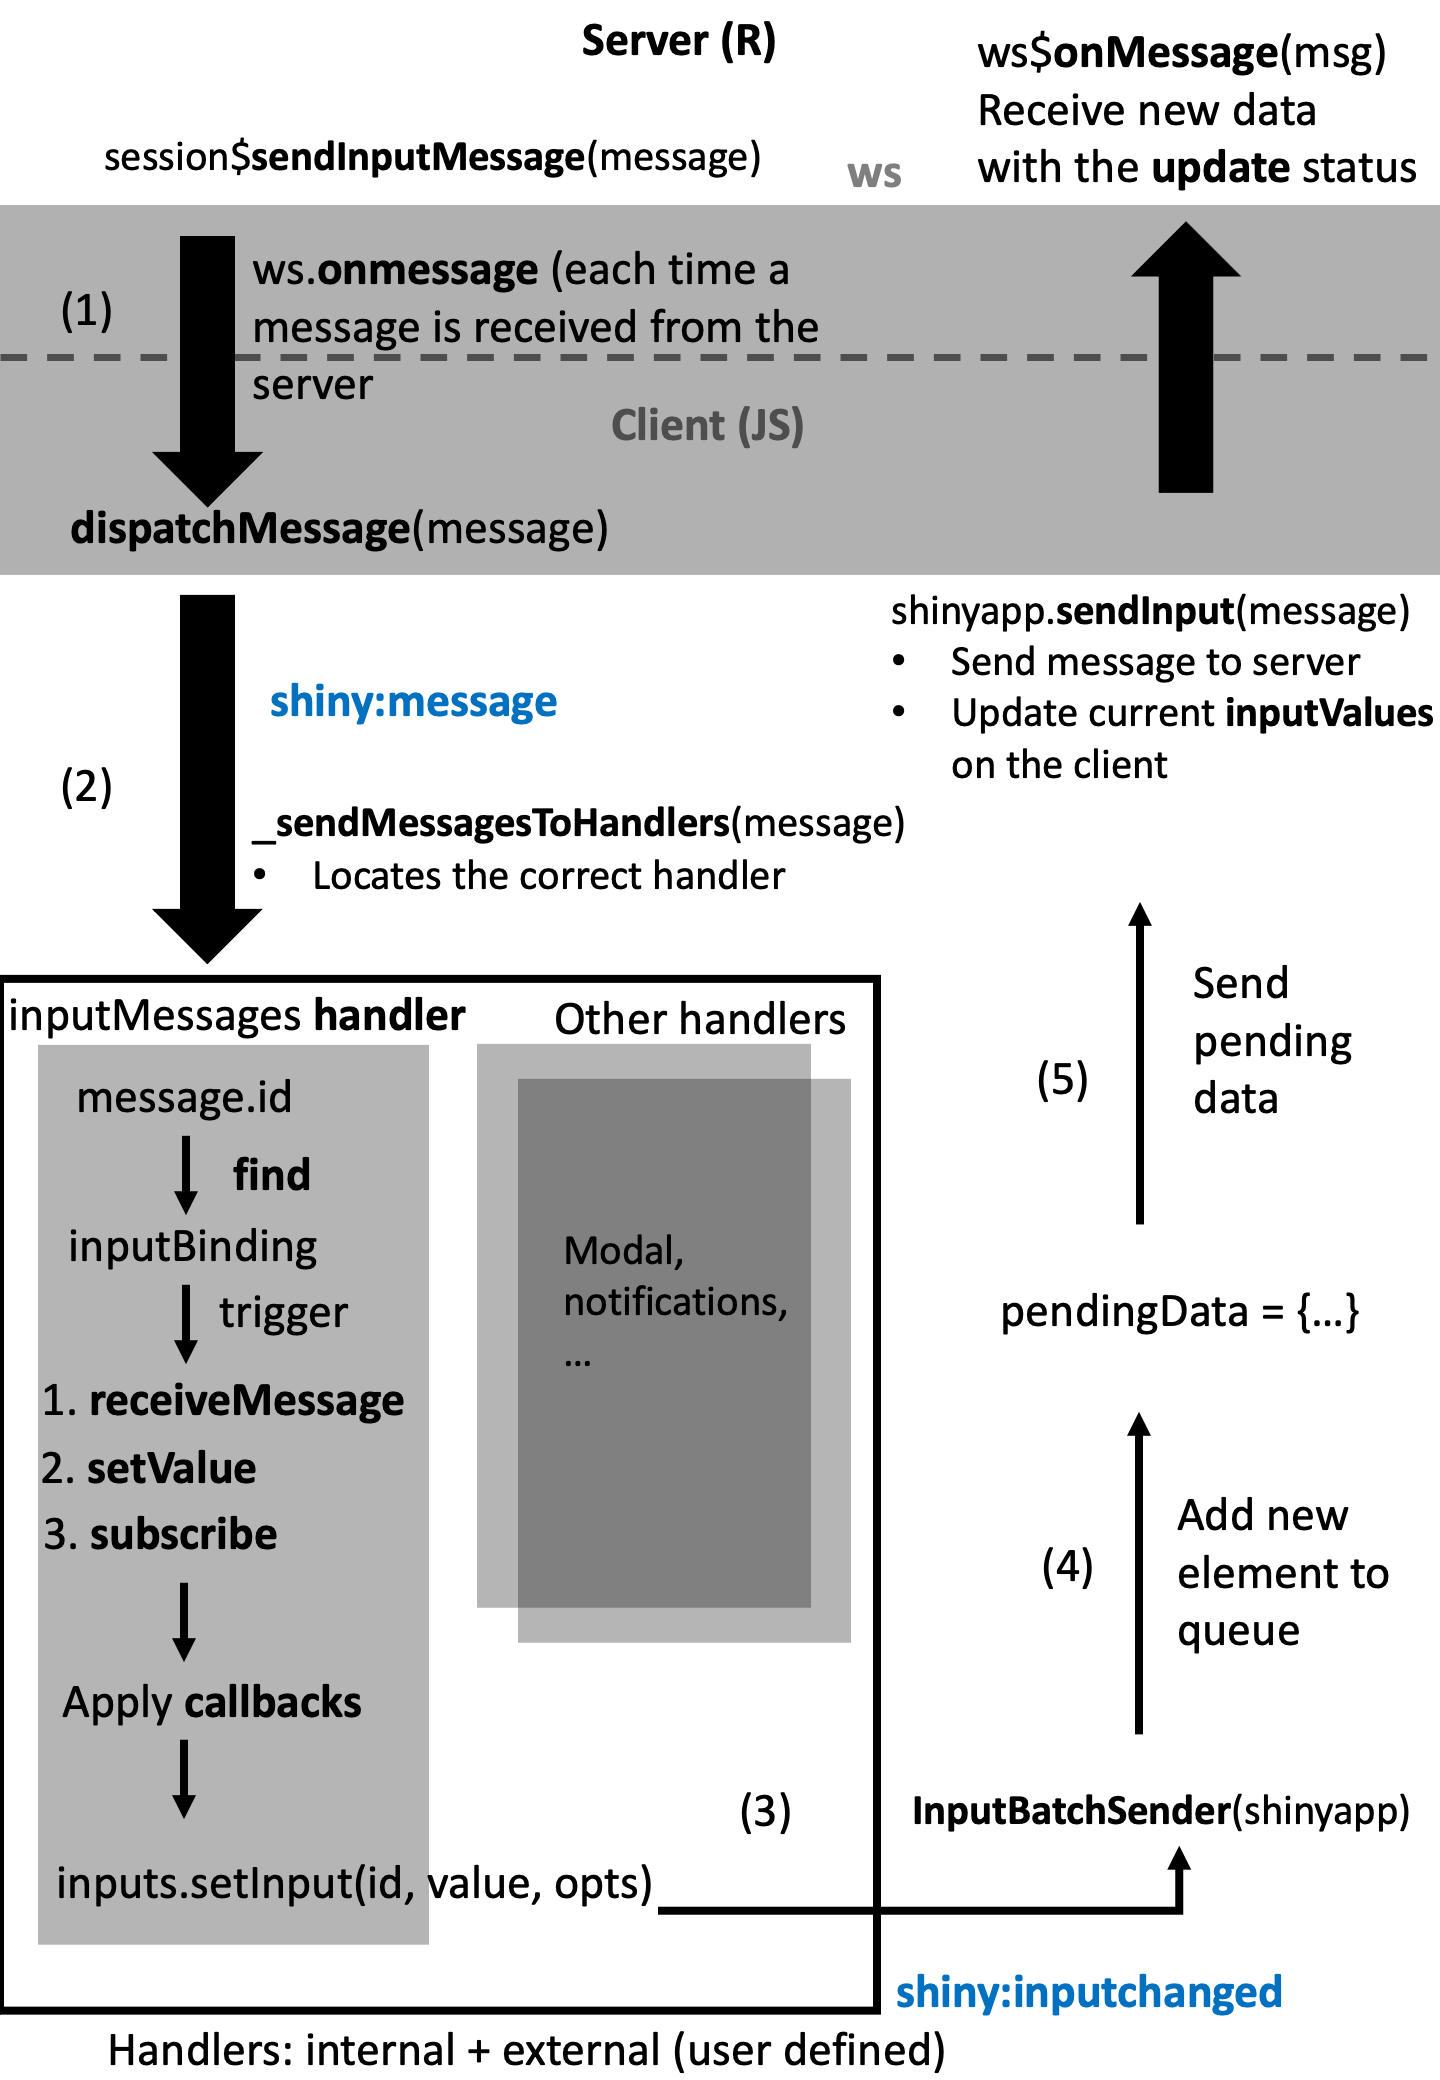
FIGURE 13.3: What Shiny does upon input update.