4 Handle HTML dependencies with {htmltools}
In this chapter, I’ll demonstrate how we can utilize htmltools (Cheng, Sievert, et al. 2021) to manage web dependencies, that is handling CSS and JS code as well as other assets in your Shiny apps. This literally opens the doors to work with almost any web framework and design outstanding user experiences with Shiny in a reasonable amount of time and reproducible manner.
4.1 Motivations
In this example, we would like to include a Material Bootstrap card in a Shiny apps, as shown in Figure 4.1.
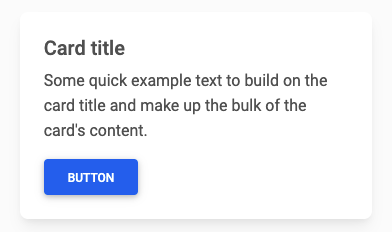
FIGURE 4.1: Material Bootstrap design card.
The naive approach would be to include the HTML code directly in the app code. my_card() creates the card structure:
library(shiny)
# we create the card function before
my_card <- function(...) {
  withTags(
    tags$div(
      class = "card",
      tags$div(
        class = "card-body",
        tags$h5(class = "card-title", "Card title"),
        tags$p(class = "card-text", "Card content"),
        tags$button(
          type = "button",
          class = "btn btn-primary",
          "Button"
        )
      )
    )
  )
}
Below is a Shiny app example:
### RUN ###
# OSUICode::run_example(
#  "htmltools/deps/card/ex1",
#   package = "OSUICode"
# )

### APP CODE ###
library(shiny)
library(OSUICode)

shinyApp(
  ui = fluidPage(
    fluidRow(
      column(
        width = 6,
        align = "center",
        br(),
        my_card("Card Content")
      )
    )
  ),
  server = function(input, output) {}
)
FIGURE 4.2: Attempt to display a Material Bootstrap card without dependencies in a Shiny app.
As depicted by Figure 4.2, nothing is displayed, which was expected since shiny (Chang et al. 2021) does not import Bootstrap 4 dependencies. Don’t panic! We load the necessary css to display this card (if required, we could include the javascript as well). We could use either includeCSS(), tags$head(tags$link(rel = "stylesheet", type = "text/css", href = "custom.css")), as described in the Shiny documentation here. Web development best practices recommend pointing to an external file rather than including CSS in the head or as inline CSS (see Chapter 6). In the below example, we use a CDN (content delivery network), but that could be a local file in the www/ folder:
### RUN ###
# OSUICode::run_example(
#  "htmltools/deps/card/ex2",
#   package = "OSUICode"
# )

### APP CODE ###
library(shiny)
library(OSUICode)

mdb_cdn <- "https://cdnjs.cloudflare.com/ajax/libs/"
mdb_css <- paste0(mdb_cdn, "mdb-ui-kit/3.6.0/mdb.min.css")

shinyApp(
  ui = fluidPage(
    tags$style("body {background: gainsboro;}"),
    # load the css code
    tags$head(
      tags$link(
        rel = "stylesheet",
        type = "text/css",
        href = mdb_css
      )
    ),
    fluidRow(
      column(
        width = 6,
        br(),
        my_card("Card Content")
      )
    )
  ),
  server = function(input, output) {}
)
The card may seem ugly, but at least it is displayed as shown in Figure 4.3. This approach is, however, not easy to share with other developers since there is no way to recover the specific dependency.
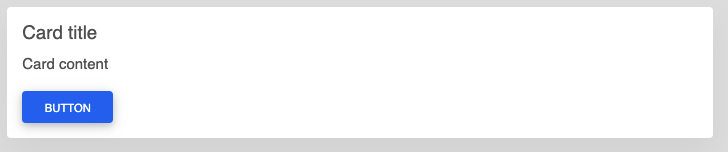
FIGURE 4.3: Material Bootstrap card within a simple app.
The best approach actually consists in leveraging the htmlDependency() and attachDependencies() functions from htmltools.
htmlDependency() takes the following main parameters:
- A name.
- A version (useful to remember on which version it is built upon).
- A path to the dependency (can be a CDN or a local folder).
- script and stylesheet to respectively pass css and scripts.
# handle dependency
mdb_cdn <- "https://cdnjs.cloudflare.com/ajax/libs/"
mdb_card_dep <- function() {
  htmlDependency(
    name = "mdb-card",
    version = "1.0",
    src = c(href = mdb_cdn),
    stylesheet = "mdb-ui-kit/3.6.0/mdb.min.css"
  )
}
If you are not pointing to a CDN and use local files, this is crucial to wrap the newly created dependency in a function since the path has to be determined at run time and not when the package builds. It means that if you are developing a package with dependencies, forgetting this step might prevent other users from getting the dependency working on their own machine (the differences between Unix and Windows OS paths is clearly a good example).
We create the card tag and give it the Material Bootstrap dependency through the attachDependencies() function.
In a recent version of htmltools, we may simply use tagList(tag, deps) instead. Importantly, attachDependencies() has an append parameter FALSE by default. Ensure to set it to TRUE if you want to keep already attached dependencies.
# create the card
my_card_with_deps <- function(...) {
  cardTag <- my_card(...)

  # attach dependencies (old way)
  # htmltools::attachDependencies(cardTag, bs4_card_dep())

  # simpler way
  tagList(cardTag, mdb_card_dep())

}
We finally run our app:
### RUN ###
# OSUICode::run_example(
#  "htmltools/deps/card/ex3",
#   package = "OSUICode"
# )

### APP CODE ###
library(shiny)
library(OSUICode)

ui <- fluidPage(
  title = "Hello Shiny!",
  tags$style("body {background: gainsboro;}"),
  fluidRow(
    column(
      width = 6,
      br(),
      my_card_with_deps("Card Content")
    )
  )
)

shinyApp(ui, server = function(input, output) { })
According to Figure 4.4, something seems to be broken or conflicting. If we look at the developer tools, we realize that the new Material Design stylesheet comes before the Shiny Bootstrap CSS, which is the source of our problems.
This raises an important consideration about htmlDependency(). Under the hood, Shiny adds many necessary dependencies like Bootstrap and jQuery, and you have no control over where your own dependencies will be inserted. Section 4.3 explains how to seamlessly solve that issue.
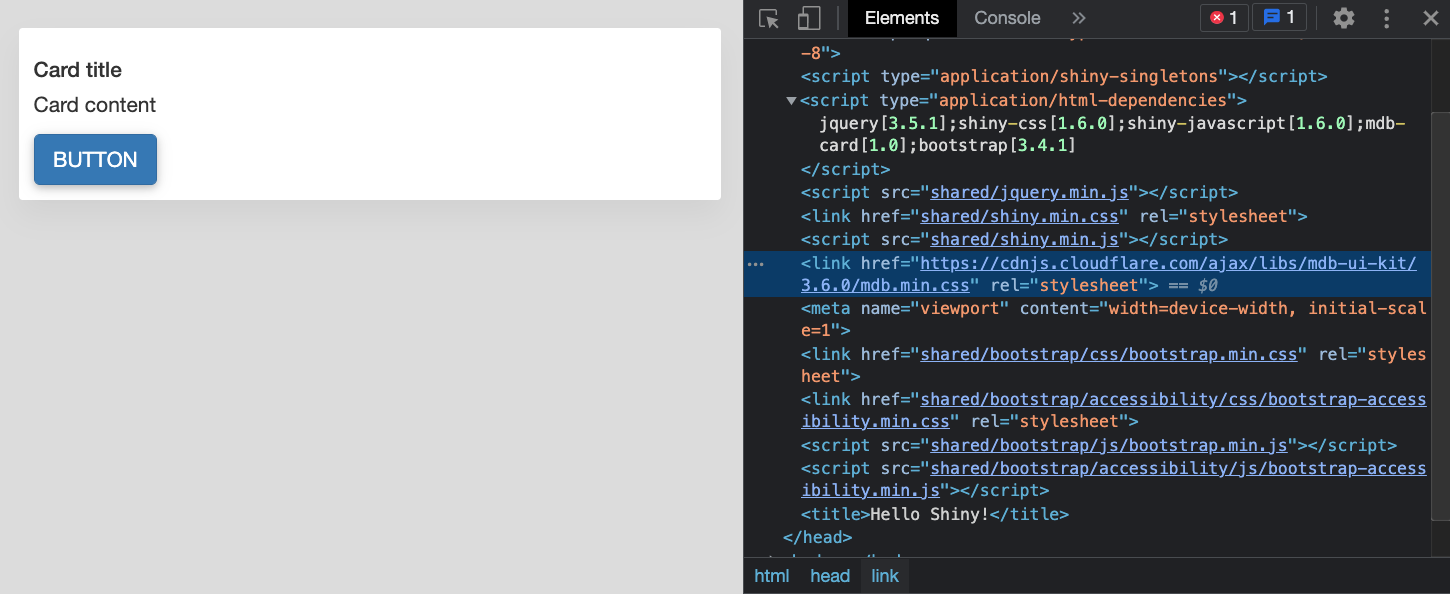
FIGURE 4.4: Conflict between Material Bootstrap and Bootstrap CSS.
With this approach, you can develop a package of custom dependencies that people could use when they need to add custom elements in shiny.
4.2 Importing HTML dependencies from other packages
The shinydashboard (Chang and Borges Ribeiro 2018) package helps to design dashboards with Shiny. In the following, we would like to integrate the box component in a classic Shiny App (without the dashboard layout). However, if you try to include the box tag, you will notice that nothing is displayed since shiny does not have shinydashboard dependencies. htmltools contains a function, namely findDependencies() that looks for all dependencies attached to a tag. Before going further, let’s define the basic dashboard skeleton:
library(shinydashboard)
dashboard_ui <- dashboardPage(
  dashboardHeader(),
  dashboardSidebar(),
  dashboardBody()
)
There are numerous details associated with shinydashboard that we will not go into.
If you are interested in learning more, please check out the package website. The key point here is the main wrapper function dashboardPage(). The fluidPage() is another wrapper function that most are already familiar with. We apply findDependencies() on dashboard_ui:
library(htmltools)
dashboard_deps <- findDependencies(dashboard_ui)
dashboard_deps[[1]]
#> List of 10
#> $ name : chr "font-awesome"
#> $ version : chr "5.13.0"
#> $ src :List of 1
#> ..$ file: chr "www/shared/fontawesome"
#> $ meta : NULL
#> $ script : NULL
#> $ stylesheet: chr [1:2] "css/all.min.css" "css/v4-shims.min.css"
#> $ head : NULL
#> $ attachment: NULL
#> $ package : chr "shiny"
#> $ all_files : logi TRUE
#> - attr(*, "class")= chr "html_dependency"For space reasons, we only printed the first dependency output, but dashboard_deps is a list containing four dependencies:
-
Font Awesome handles icons. Interestingly, this dependency is provided by
dashboardHeader, especially theshiny::icon("bars")that collapses the left sidebar. - Bootstrap is the main HTML/CSS/JS template. Importantly, please note the version 3.3.7, whereas the current is 4.5.2.
- AdminLTE is the dependency containing HTML/CSS/JS related to the admin template. It is closely linked to Bootstrap 3.
- shinydashboard, the CSS and javascript necessary for our dashboard to work properly. In practice, integrating custom HTML templates to Shiny does not usually work out of the box for many reasons, and some modifications are necessary. For instance, here is a list of changes to optimize AdminLTE for Shiny. This has major consequences on the template maintenance such that upgrading to another AdminLTE version would require modifying all these elements by hand. You may understand why template maintainers are quite often reluctant to upgrade their dependencies as it might breake the whole package, quite easily.
Below, we attach the dependencies to the box() with tagList(), as shown above. Notice that our custom box() does not contain all parameters as in the official shinydashboard version, which is actually OK at this time. For a better contrast with the body, we add a custom color to the background,
as depicted by Figure 4.5:
my_dashboard_box <- function(title, status) {
  tagList(
    box(title = title, status = status),
    dashboard_deps
  )
}
### RUN ###
# OSUICode::run_example(
#  "htmltools/deps/dashboard",
#   package = "OSUICode"
# )

### APP CODE ###
library(shiny)
library(OSUICode)

ui <- fluidPage(
  tags$style("body { background-color: gainsboro; }"),
  titlePanel("Shiny with a box"),
  my_dashboard_box(title = "My box", status = "danger"),
)
server <- function(input, output) {}
shinyApp(ui, server)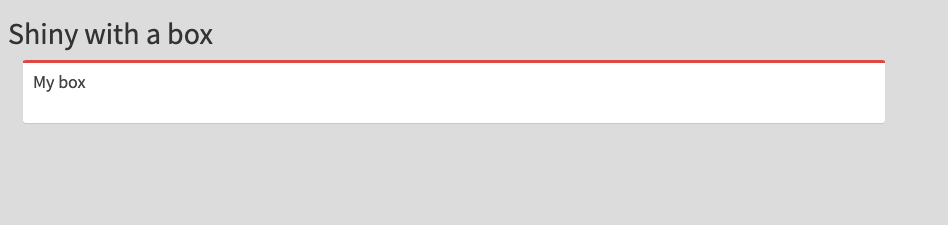
FIGURE 4.5: AdminLTE2 box inside classic Shiny app.
You now have limitless possibilities. Interestingly, the shinyWidgets useBs4Dash() function relies on the same approach.
4.3 Suppress dependencies
In rare cases, you may need to remove an existing conflicting dependency. The suppressDependencies() function allows users to perform this task. For instance, shiny.semantic built on top of
semantic ui is not compatible with Bootstrap, the latter being dropped from the list, as illustrated by Figure 4.6.
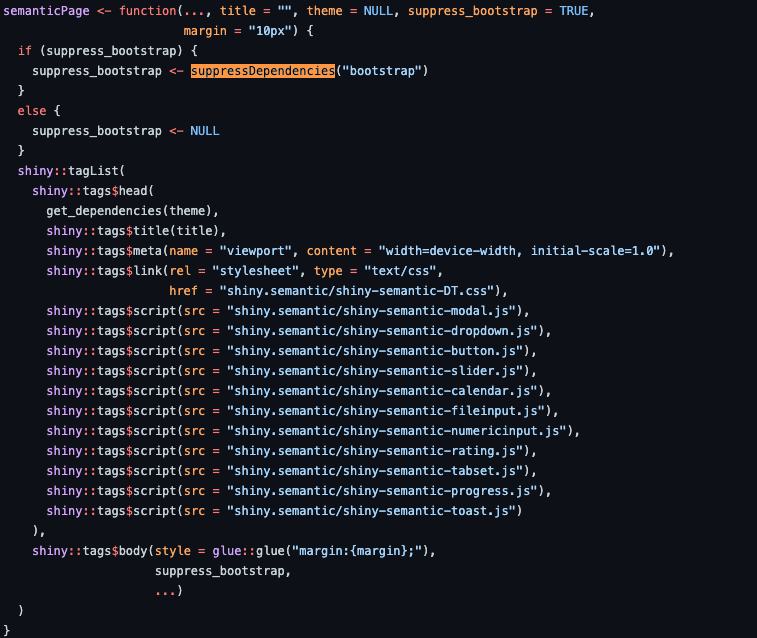
FIGURE 4.6: Deletion of Bootstrap inside semanticPage.
Below, we remove the AdminLTE2 dependency from a shinydashboard page and nothing is displayed (as expected):
### RUN ###
# OSUICode::run_example(
#  "htmltools/deps/remove-deps",
#   package = "OSUICode"
# )

### APP CODE ###
library(shiny)
library(shinydashboard)

shinyApp(
  ui = dashboardPage(
    dashboardHeader(),
    dashboardSidebar(),
    dashboardBody(suppressDependencies("AdminLTE")),
    title = "Dashboard example"
  ),
  server = function(input, output) { }
)
4.4 Resolve dependencies
Imagine a situation in which we would like to use the very last version of Font Awesome icons, which is currently 5.15.1 according to jsdelivr. We recall that shiny already provides version 5.13.0 through the icon() function. Including another version would probably cause conflicts, and we would like to avoid that case. htmltools has a resolveDependencies() tool that removes any redundant dependencies, keeping the dependency with the higher version if names are identical:
jsdelivr_cdn <- "https://cdn.jsdelivr.net/npm/@fortawesome/"
ft_aws <- paste0(jsdelivr_cdn, "fontawesome-free@5.15.1/")
new_icon_dep <- htmlDependency(
  name = "font-awesome",
  version = "5.15.1",
  src = c(href = ft_aws),
  stylesheet = "css/all.min.css"
)

icon_deps <- list(
  new_icon_dep,
  findDependencies(shiny::icon("th"))[[1]]
)

resolveDependencies(icon_deps)
#> [[1]]
#> List of 10
#> $ name : chr "font-awesome"
#> $ version : chr "5.15.1"
#> $ src :List of 1
#> ..$ href: chr "https://cdn.jsdelivr.net/npm/@fortawesome/fontawesome-free@5.15.1/"
#> $ meta : NULL
#> $ script : NULL
#> $ stylesheet: chr "css/all.min.css"
#> $ head : NULL
#> $ attachment: NULL
#> $ package : NULL
#> $ all_files : logi TRUE
#> - attr(*, "class")= chr "html_dependency"Combining findDependencies(), suppressDependencies() and resolveDependencies() gives you great power to successfully manage your dependencies!
4.5 Insert Custom script in the head
With shinydashboardPlus, users can fine-tune their dashboard behavior with a simple option parameter passed to dashboardPage(). The sidebarExpandOnHover capability that consists of expanding the sidebar when hovering on it, is part of those options, yet it is not exposed by shinydashboard. Under the hood, all those options are gathered in a list, then converted into JSON to eventually generate a JavaScript configuration file. Until now, we only saw two ways to include scripts or stylesheets. How do we include any arbitrary script (defined on the fly by the user when the app starts) in a dependency?
htmlDependency() has a head parameter allowing passage of any lines of HTML to insert into the document head. We can easily imagine giving it a string containing a script. Below, we first construct the options list. Then, we create the dependency: notice since src is mandatory, we have to give it a value, but we will not use script nor stylesheet arguments.
options <- list(
  sidebarExpandOnHover = TRUE,
  boxWidgetSelectors = list(
    remove = '[data-widget="remove"]'
  )
)

config_script <- function(options) {
  htmlDependency(
    "options",
    as.character(utils::packageVersion("shinydashboardPlus")),
    src = c(file = system.file(
      "shinydashboardPlus-2.0.0",
      package = "shinydashboardPlus")
    ),
    head = if (!is.null(options)) {
      paste0(
        "<script>var AdminLTEOptions = ",
        jsonlite::toJSON(
          options,
          auto_unbox = TRUE,
          pretty = TRUE
        ),
        ";</script>"
      )
    }
  )
}

# show the script
print(HTML(config_script(options)$head))
#> <script>var AdminLTEOptions = {
#> "sidebarExpandOnHover": true,
#> "boxWidgetSelectors": {
#> "remove": "[data-widget=\"remove\"]"
#> }
#> };</script>We invite the reader to run the example below involving shinydashboardPlus, open the HTML inspector and look at the head.
### RUN ###
# OSUICode::run_example(
#  "htmltools/deps/custom",
#   package = "OSUICode"
# )

### APP CODE ###
library(shiny)
library(shinydashboard)
library(shinydashboardPlus)

options <- list(
  sidebarExpandOnHover = TRUE,
  boxWidgetSelectors = list(
    remove = '[data-widget="remove"]'
  )
)

shinyApp(
  ui = dashboardPage(
    options = options,
    header = dashboardHeader(),
    sidebar = dashboardSidebar(),
    body = dashboardBody(),
    controlbar = dashboardControlbar(),
    title = "DashboardPage"
  ),
  server = function(input, output) { }
)
According the the AdminLTE documentation, global options must be passed before loading the app.min.js script. Creating this “dummy” dependency allowed us to do so, as shown on Figure 4.7.
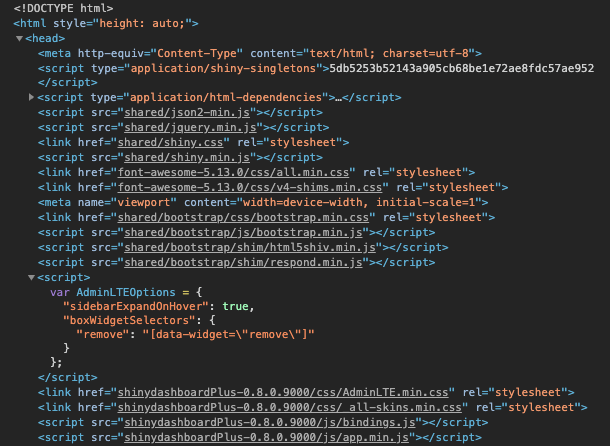
FIGURE 4.7: Insert arbitrary script in the head.